I can't bake so I am going to try to make a Violin.
Imperfect violin better than unfinished perfect violin?
I like making things,

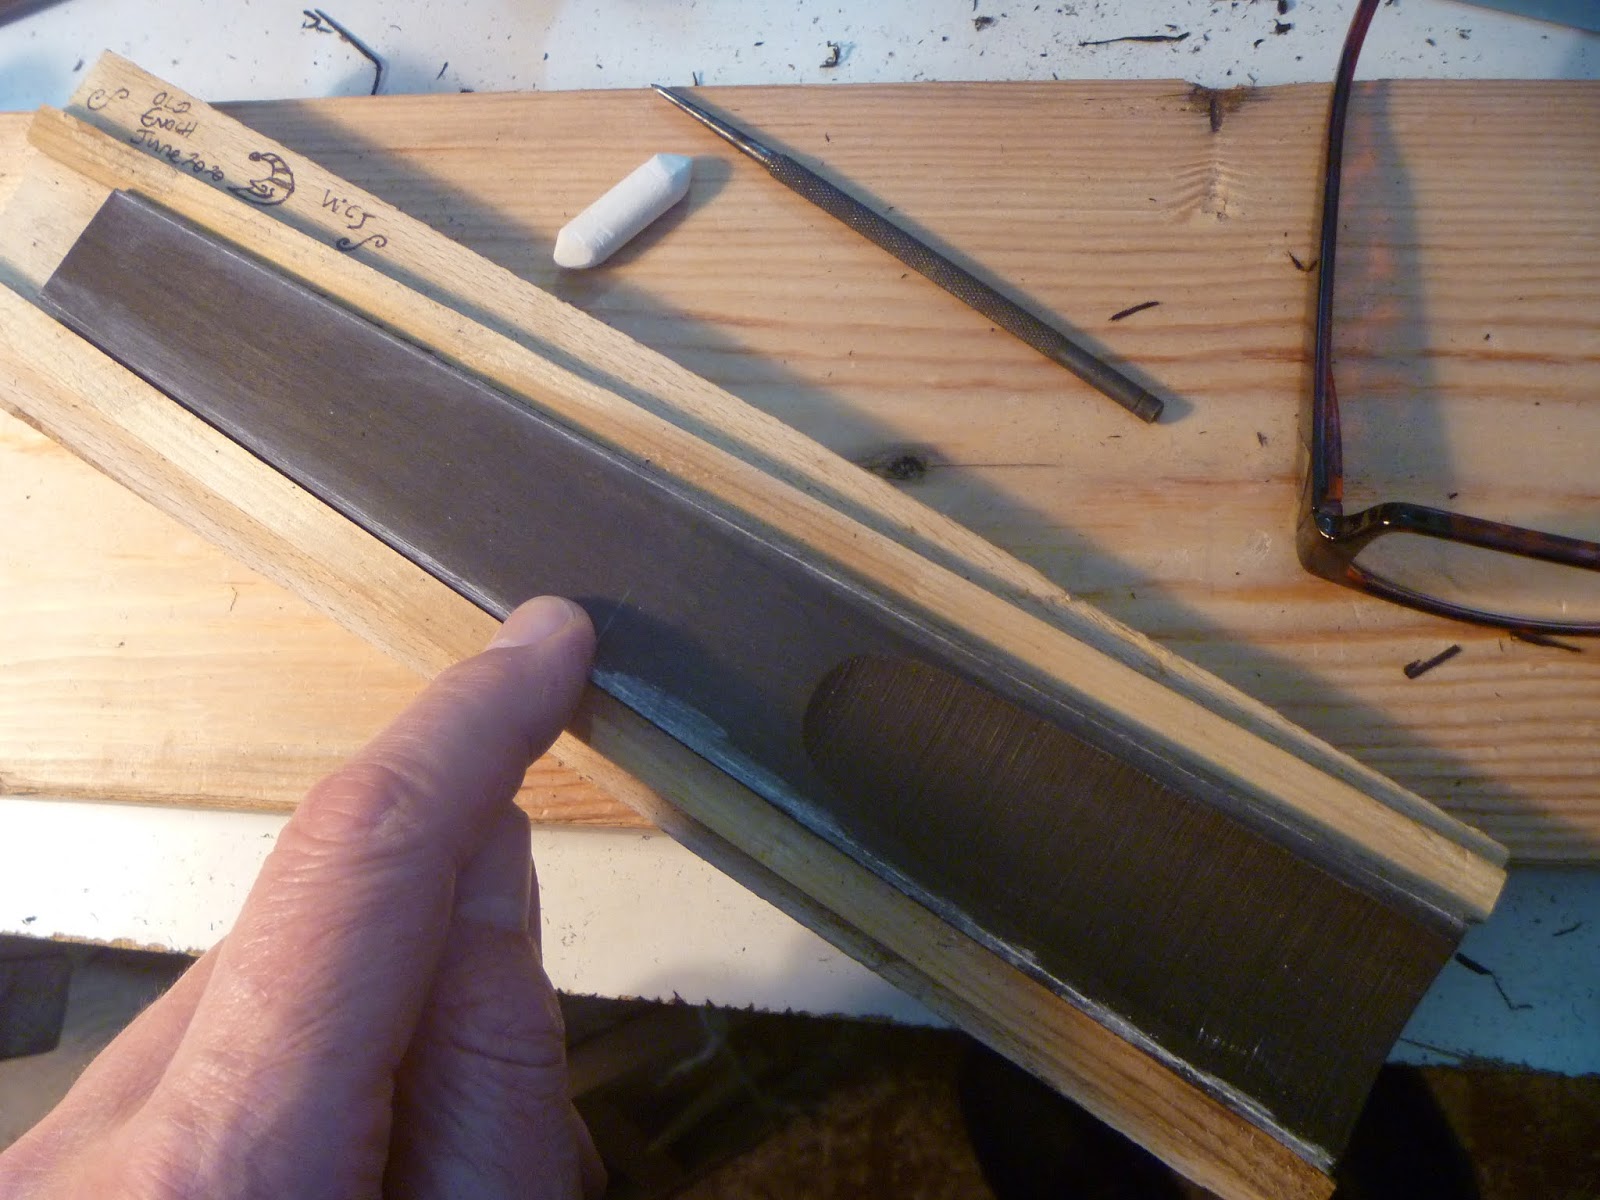
(Could this possibly be Old Enoch's clawhammer? - see profile - Blam Me Master' it isn't! but I am still quite fond of it. I got it in Venice)
wood and old tools,
(For MORE on old tool stuff, why not take a trip to The Island of Tools ? my other post)

Hand Tools
I don't like or use power tools but still risk my life when making things!

Violin Making and Cobbling
Violin Baking?
Diary of a Violin Cobbler
Day 1 The right piece of Wood (3rd March 2020)

A bit of Sycamore I got in about 2006 from the local churchyard. I was shocked when a friend visited me and expressed admiration for my stock of dry firewood!
------To be continued, I'm going up to my workhop now, for a while.
Day 2 Chopping and Planing (4th March 2020)

Day 3 Violin and Cornet (6th March 2020)

When I go out for walk I usually go through the churchyard and pay my respects to the old lime trees that are there. Their small yellow blossoms have a lovely gentle sweet smell in summer. I have known these trees all my life and enjoy walking along this way. I don't think I did any violin work this day.

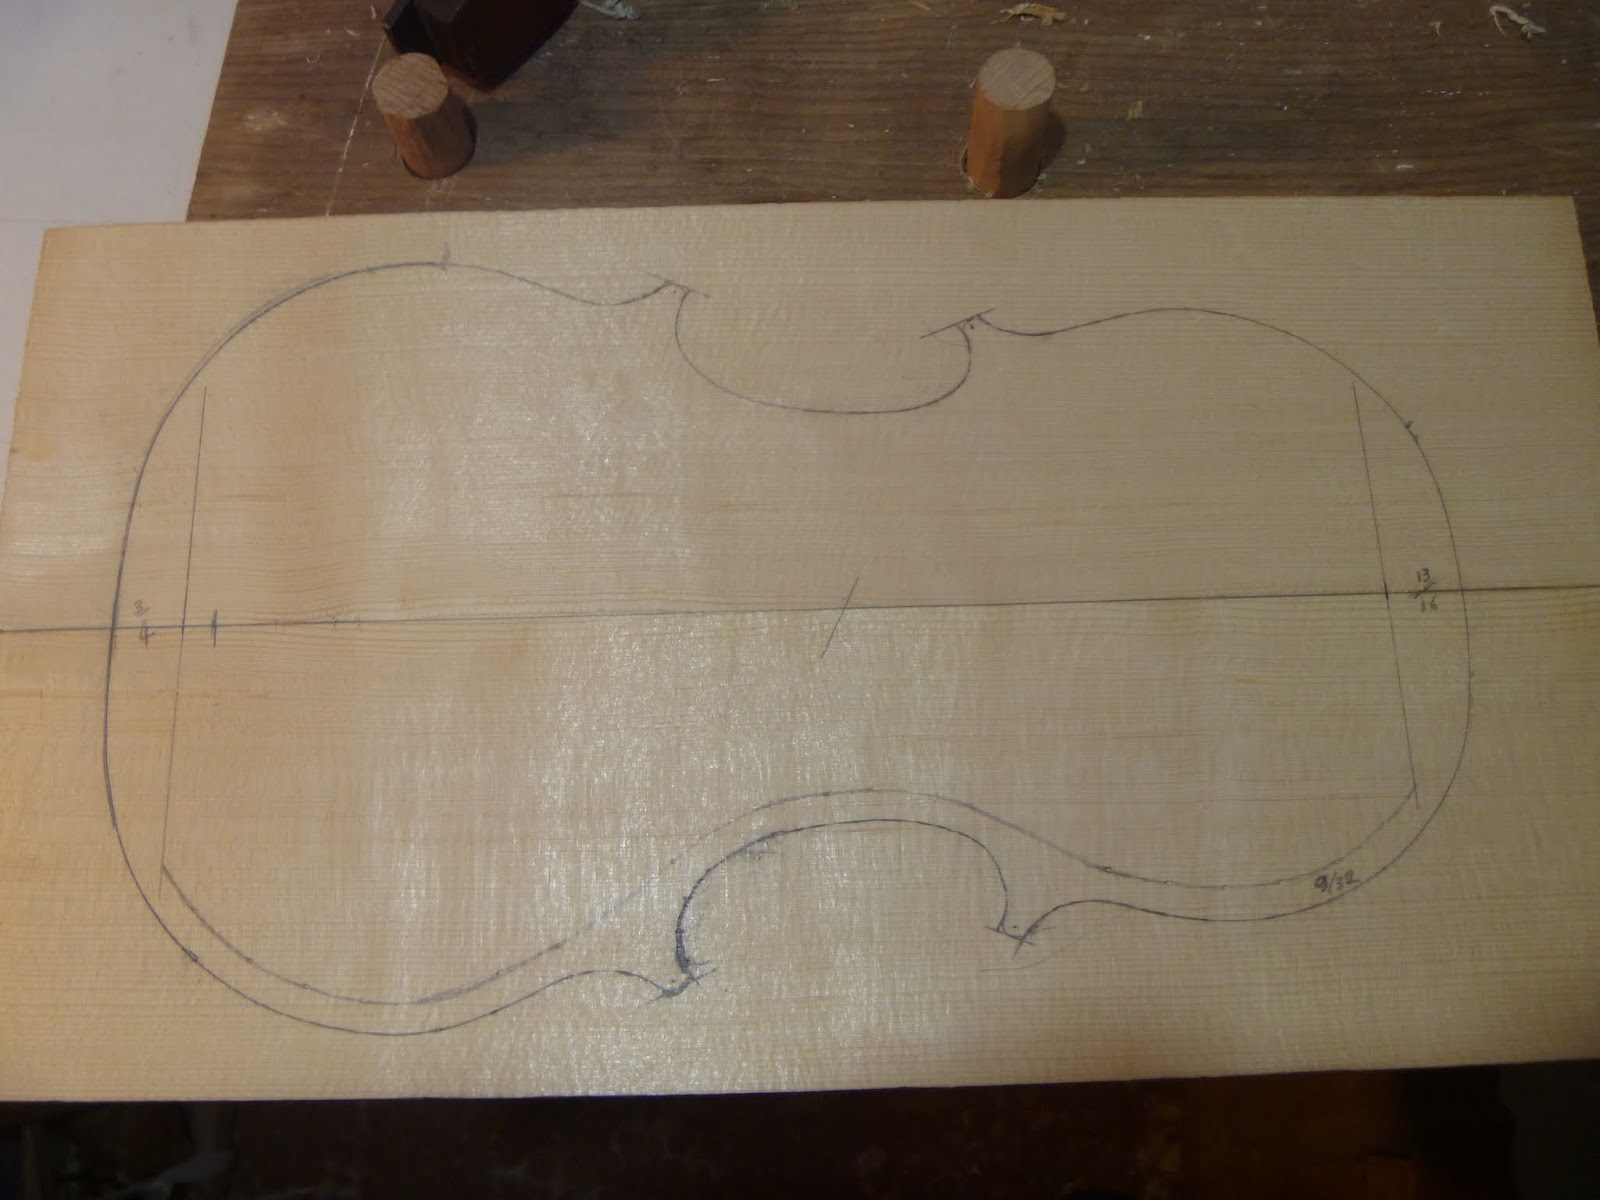
Day 4 Drawing the Mould (11th March 2020)
Here I have drawn around my template to give the outline for my violin mould. The crossings out on the corners are due to mistakes I made making the template, the drawing on the paper is an indication of the outline of the finished violin

Day 5 Sawing (19th March)
Here I am using a home-made bowsaw to saw out the violin mould.

Day 6 Chiselling (20th March)
Chiselling and gouging the mould down to the marked line. I am using a piece of wood resting against the gouge to help me keep the cuts and therefore the sides of the mould nice and vertical
Day 7 Sawing in disguise (21st March)
I was momentarily shocked today to find what appeared to be a short nosed elephant had somehow got into my workshop then I realised it was my reflection in the small mirror on the bathroom cabinet!
Being slightly asthmatic it is advisable to use my dustmask during sawing etc, especially in a very small poorly ventilated room. It isn't comfortable though and interferes with my glasses.
Being slightly asthmatic it is advisable to use my dustmask during sawing etc, especially in a very small poorly ventilated room. It isn't comfortable though and interferes with my glasses.

Day 8 Drilling (26th March)
Here I am using an old brace and bit to drill the holes in the mould

I have copied my mould design from pictures of the ones used by Stradivari - which are preserved in the Violin Museum in Cremona. I am trying to make a violin using mainly historically 'appropriate' methods because I find it interesting and like to do things this way. Occasionally a more modern handtool may creep in though in lapses of old tool rigour

On my walk today. The view over the Tyne valley when leaning on the churchyard wall

There is something nice about being able to stand in the middle of Whickham Front Street during what is usually rush hour. I'm sure the air seems fresher at the moment?

Nice tree - Maybe Maple?
I noticed this nice looking tree on my walk, the lack of leaves means an attractive wigglyness of branches can be seen -some kind on Maple, I think? I'll look at it when the leaves come out.

I had a look today (9th May) and the leaves were out and 'blam me master' it is a tulip tree!
Day 9 Never mind the Blocks (30th March)
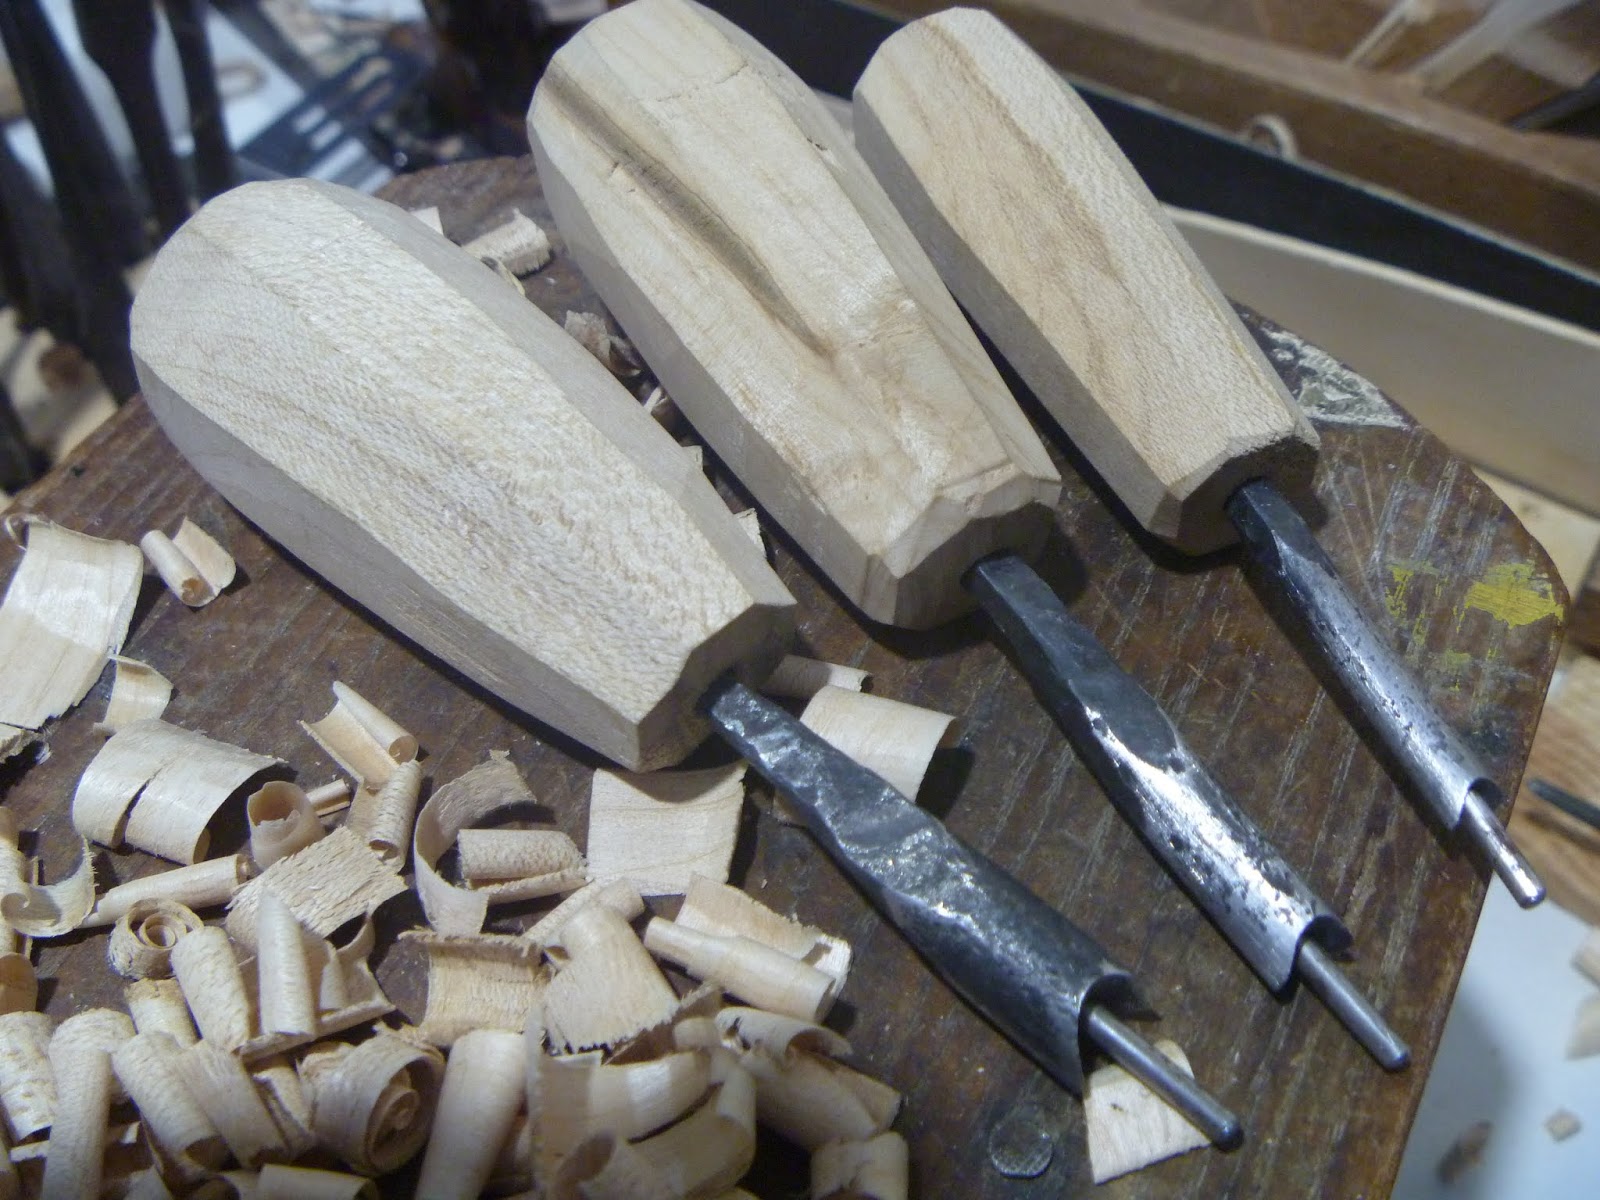
I am using a 'club' and small axe to split wood for the violin corner blocks.

Here I have put the blocks on the mould in the positons they will be glued later

A nice looking cherry tree full of blossom near the start of my daily walk

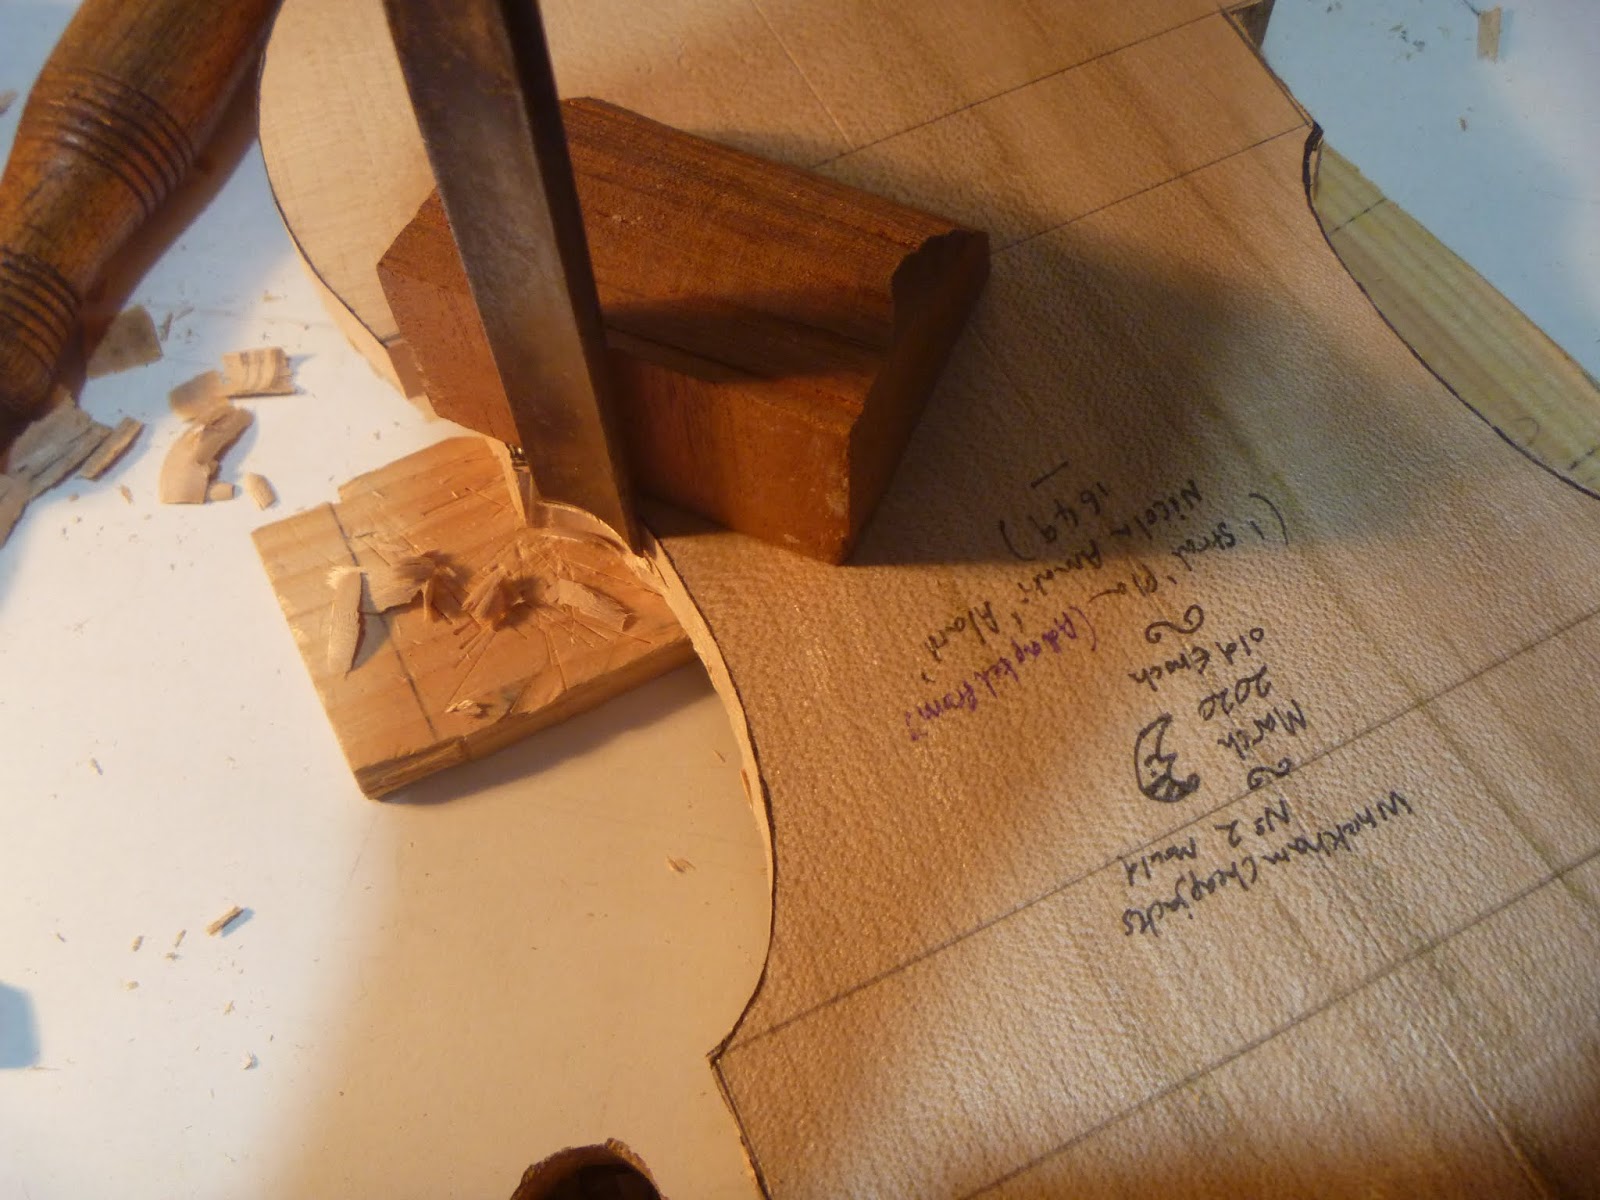
Day 10 Shaping the Blocks on the Mould (31st March)
The corner and end blocks have been lightly glued to the mould and here they are being shaped with a curved gouge to form the points for the violin's corners and the end blocks have been shaped with a flat chisel to form the curves of the top and bottom of the violin body

Day11 Big Poplar tree and Planing Violin Sides/ Ribs (1st April)
I've added lots of pictures and will add some words soon, as you can see I don't really know how to write a blog but I do like trees!
When out on a walk I was delighted to discover this big old poplar tree (I think/hope it may be a native black poplar) surviving in the middle of a housing estate built around 1970. I tried to imagine how the land looked before the houses.
When out on a walk I was delighted to discover this big old poplar tree (I think/hope it may be a native black poplar) surviving in the middle of a housing estate built around 1970. I tried to imagine how the land looked before the houses.

Rustling after midnight
A couple of years ago I went out for a walk one summer after midnight, the streets were quiet and I noticed something special about these big poplar trees, if you stand beneath one when it is quiet and a gentle breeze is blowing you will be immersed in the gentle rustle of thousands of leaves! If you move and listen to other trees nearby you'll hear the expected noise of breeze through twigs and leaves but not much rustling. I was most pleased with my discovery and at each of the two or three poplars on my route I stood and relished the rustle! These poplar trees also often seem to have a sort of obstinate lean to their trunk and lovely deep ribbed bark.
Meanwhile, back to the business of violin cobbling. Here I am using a home-made clamp to hold very thin wood while I plane it smooth and very thin. These strips of wood - norway maple, I think, from a log that I found near where I live - some of which I sawed into thin strips - will be bent and fixed around the mould to form the sides or ribs of the violin.
The strange plane is home-made from a bit of elder.

Day 12 Bending the ribs and fixing them to the Mould (2nd April)
Bending Iron
I forgot to take pictures of my home-made bending iron in use so I am cheating here using a picture from a couple of years ago when I made a ukulele. The iron consists of a fairly thick round steel bar fixed to a metal bar and wooden handle. Here I am heating it up on my much abused gas cooker.

The thin flat rib/side to bent is placed upon a piece of wood (used to protect my kitchen worktop) heated by application of the hot iron. The iron is moved back and the wood pulled upwards and bent to shape when hot, the iron remains in contact heating the next section to be bent until the desired curve is achieved. The outine of the instrument can be drawn on the bench top to use for quick comparison and the wood reheated and adjusted. The curve piece of wood is held in the hand until it cools and is 'set' in the desired shape.

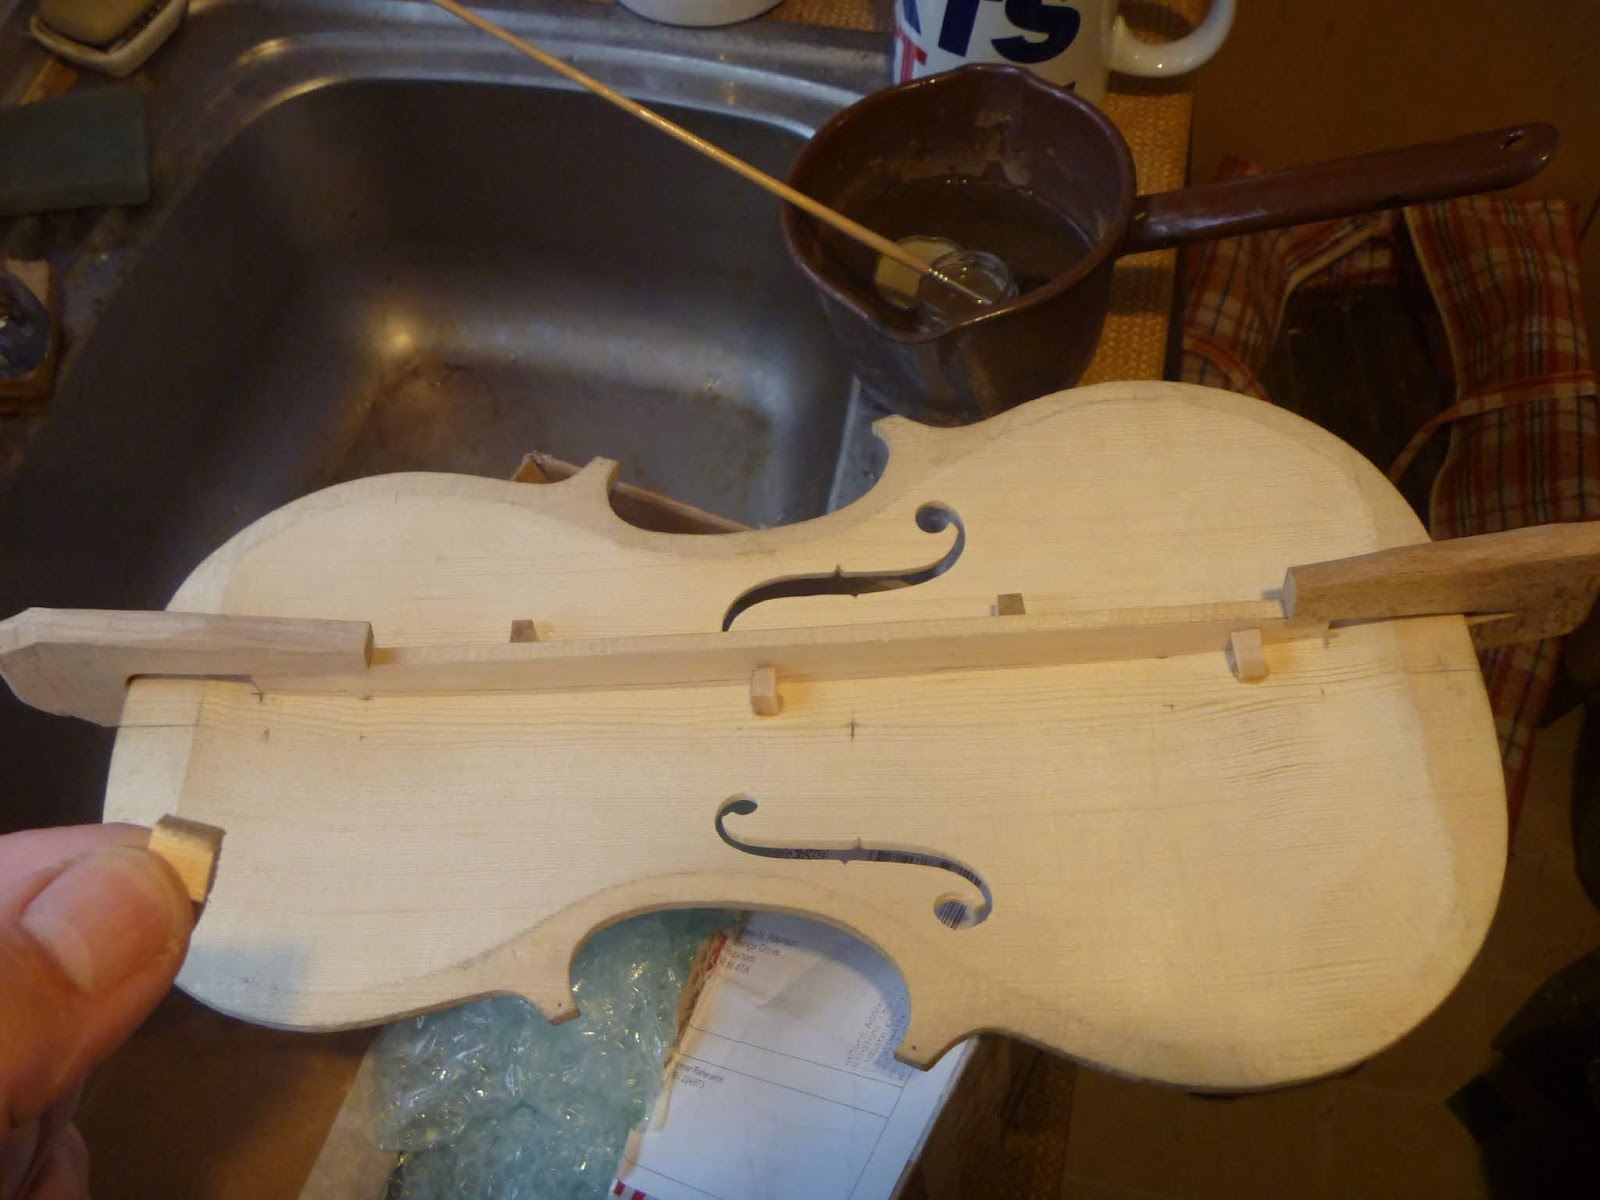
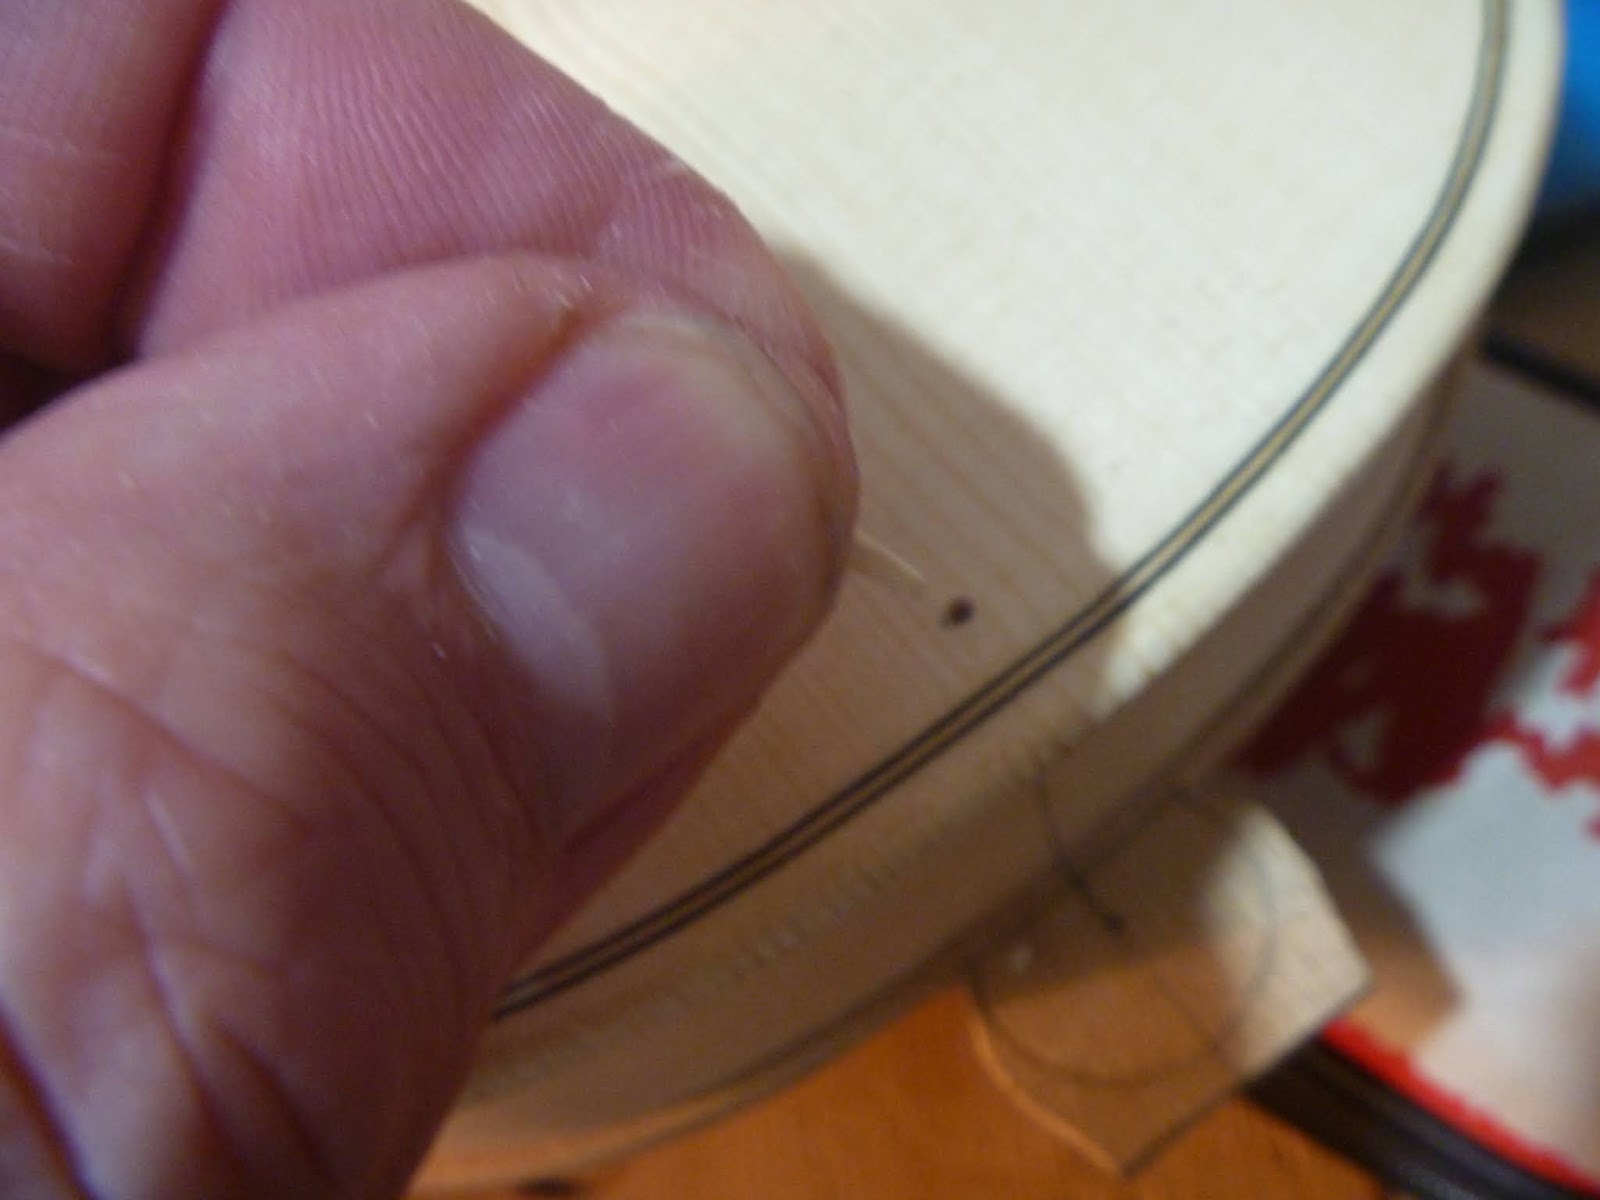
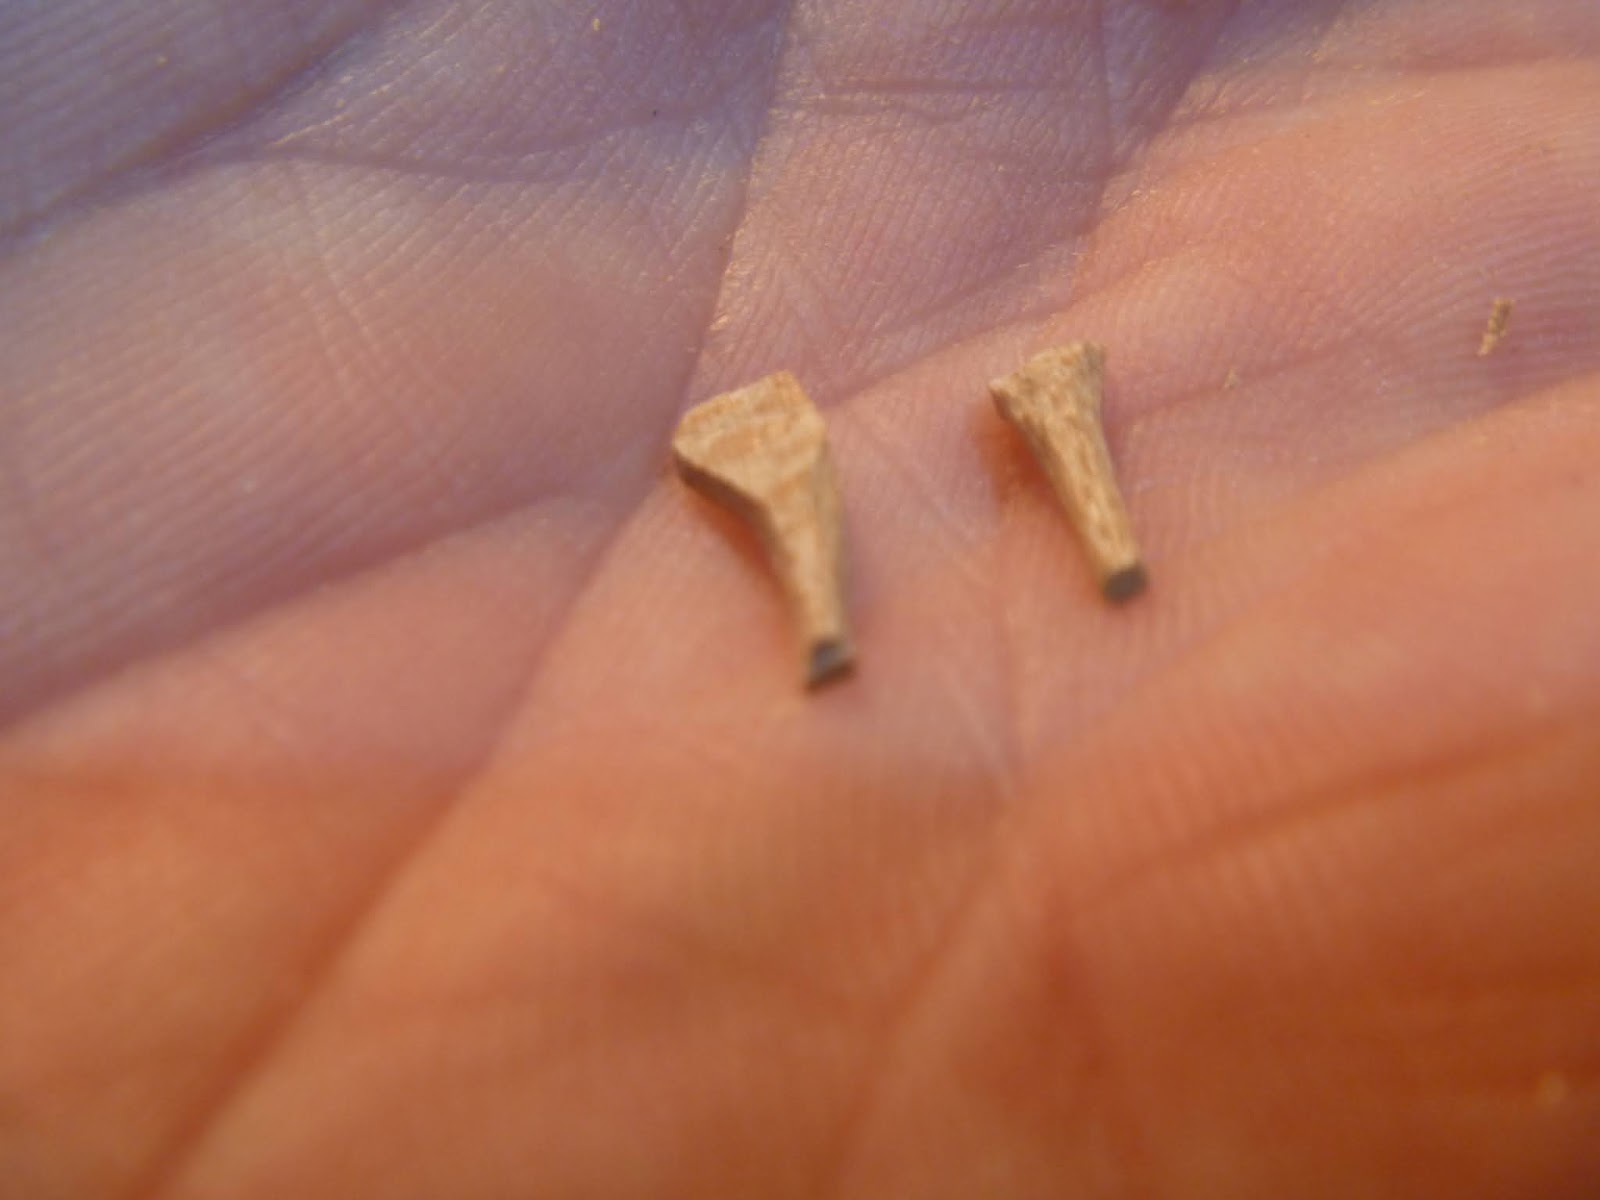
Back to the violin. The bending iron can be seen at the left, I had just bent the pieces of wood for the centre of the violin. Here I am gluing these centre pieces to the corner blocks on the mould. You can see here why the holes were made in the Stradivari type mould. Wooden pegs, shaped clamping pieces and strong string are used with the carefully positioned holes to tie the and clamp the glued wood into place. Most modern makers use metal clamps instead of this method but I like this as it it nice and low tech, the pegs and shaped clamping pieces were all made from scrap wood. Metal clamps can be expensive. In a moment of extravagance I bought some thick linen twine for the string, I thought thick string would be stronger and wouldn't cut into the hands when pulling to tension. The glue is left overnight to dry and set before removing the string clamps.

Day 13 (4th April) Hot glue Excitement!
Here the bottom rib is being glued to the corner and bottom blocks. The traditional glue is applied hot so the positioning of the wood, holding and tieing must be done quickly and can get quite exciting! I must get around to tidying the kitchen .. some day.

Here the sides are all glued to the blocks and the string and pegs etc removed. The corners need to be trimmed carefully to length

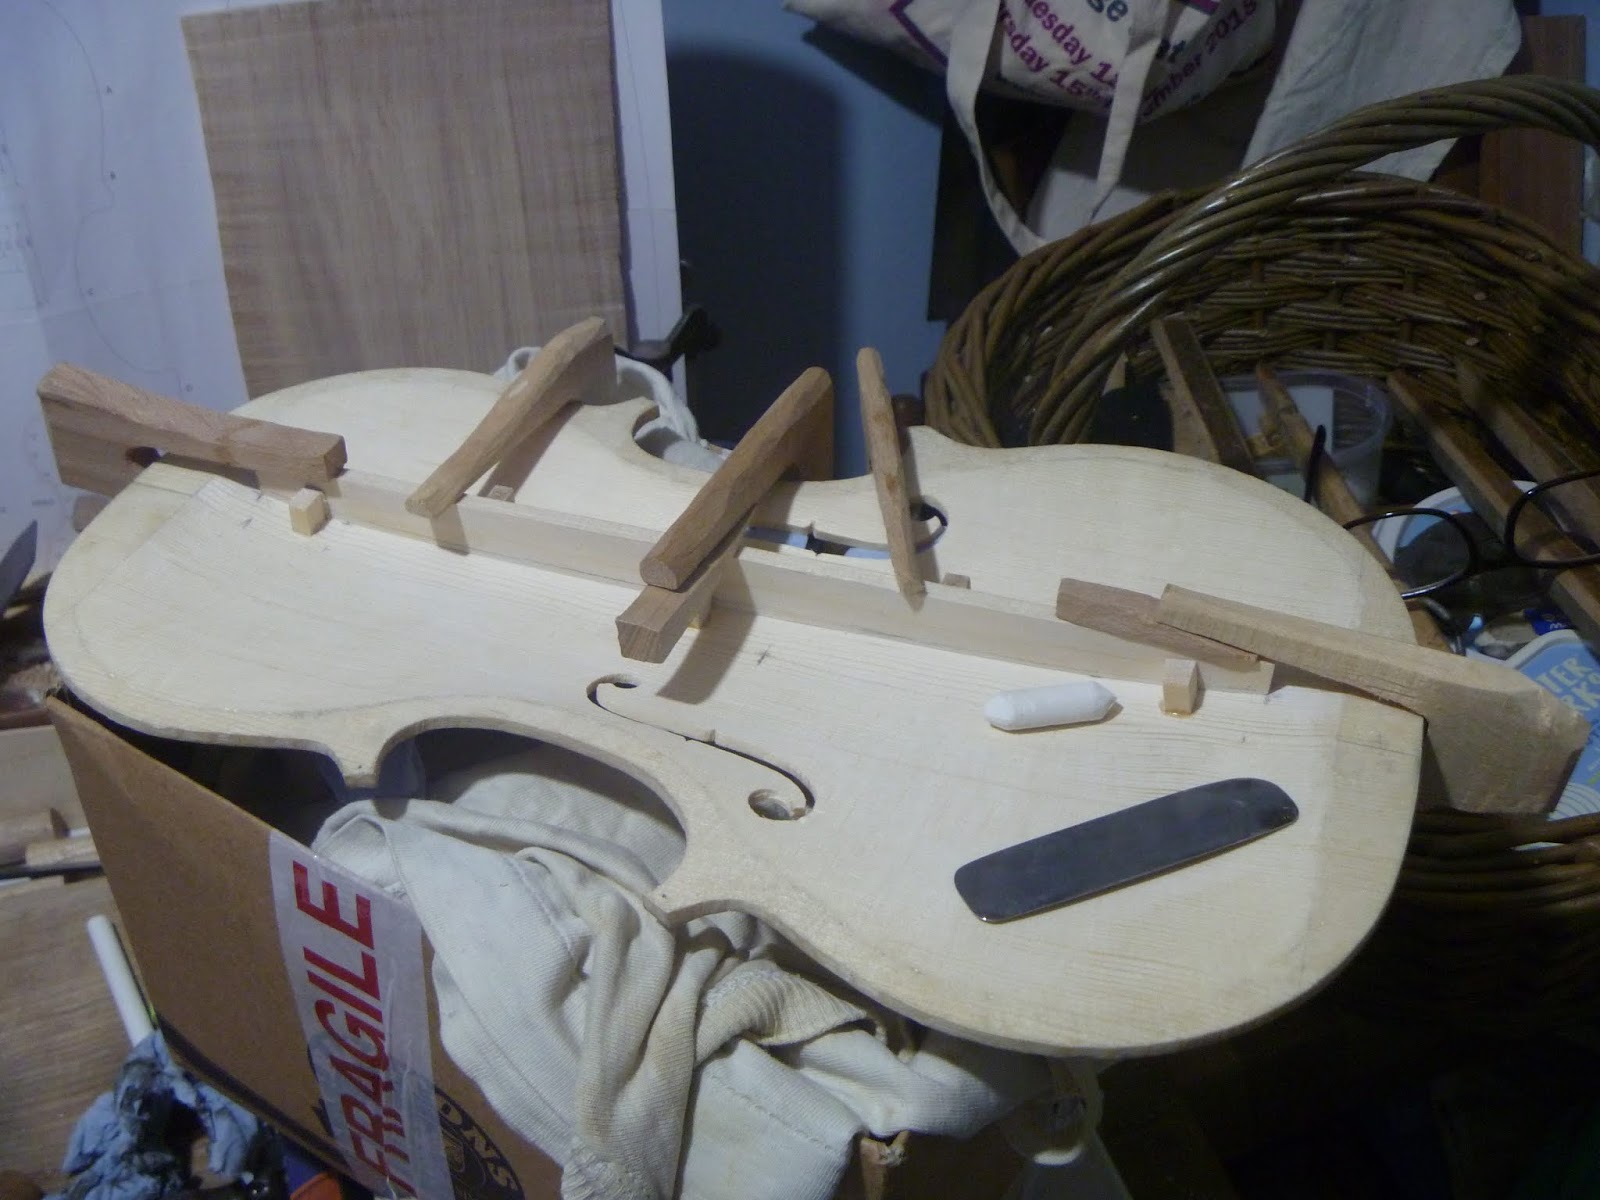
Day14 (5th April) The Linings
A violin's ribs are very thin and wouldn't have a big enough surface to glue the top and back to so thin strips of wood are bent then glued to their top and bottom edges to make a wider gluing area and make the structure stiff but still light in weight. Here we can see how the tightly curved centre rib linings are also fitted into the corner blocks for additional security. The ribs were made from some willow I found near the river Derwent. They were sawn and planed thin then bent into tight curves using the same bending iron I used for the ribs.

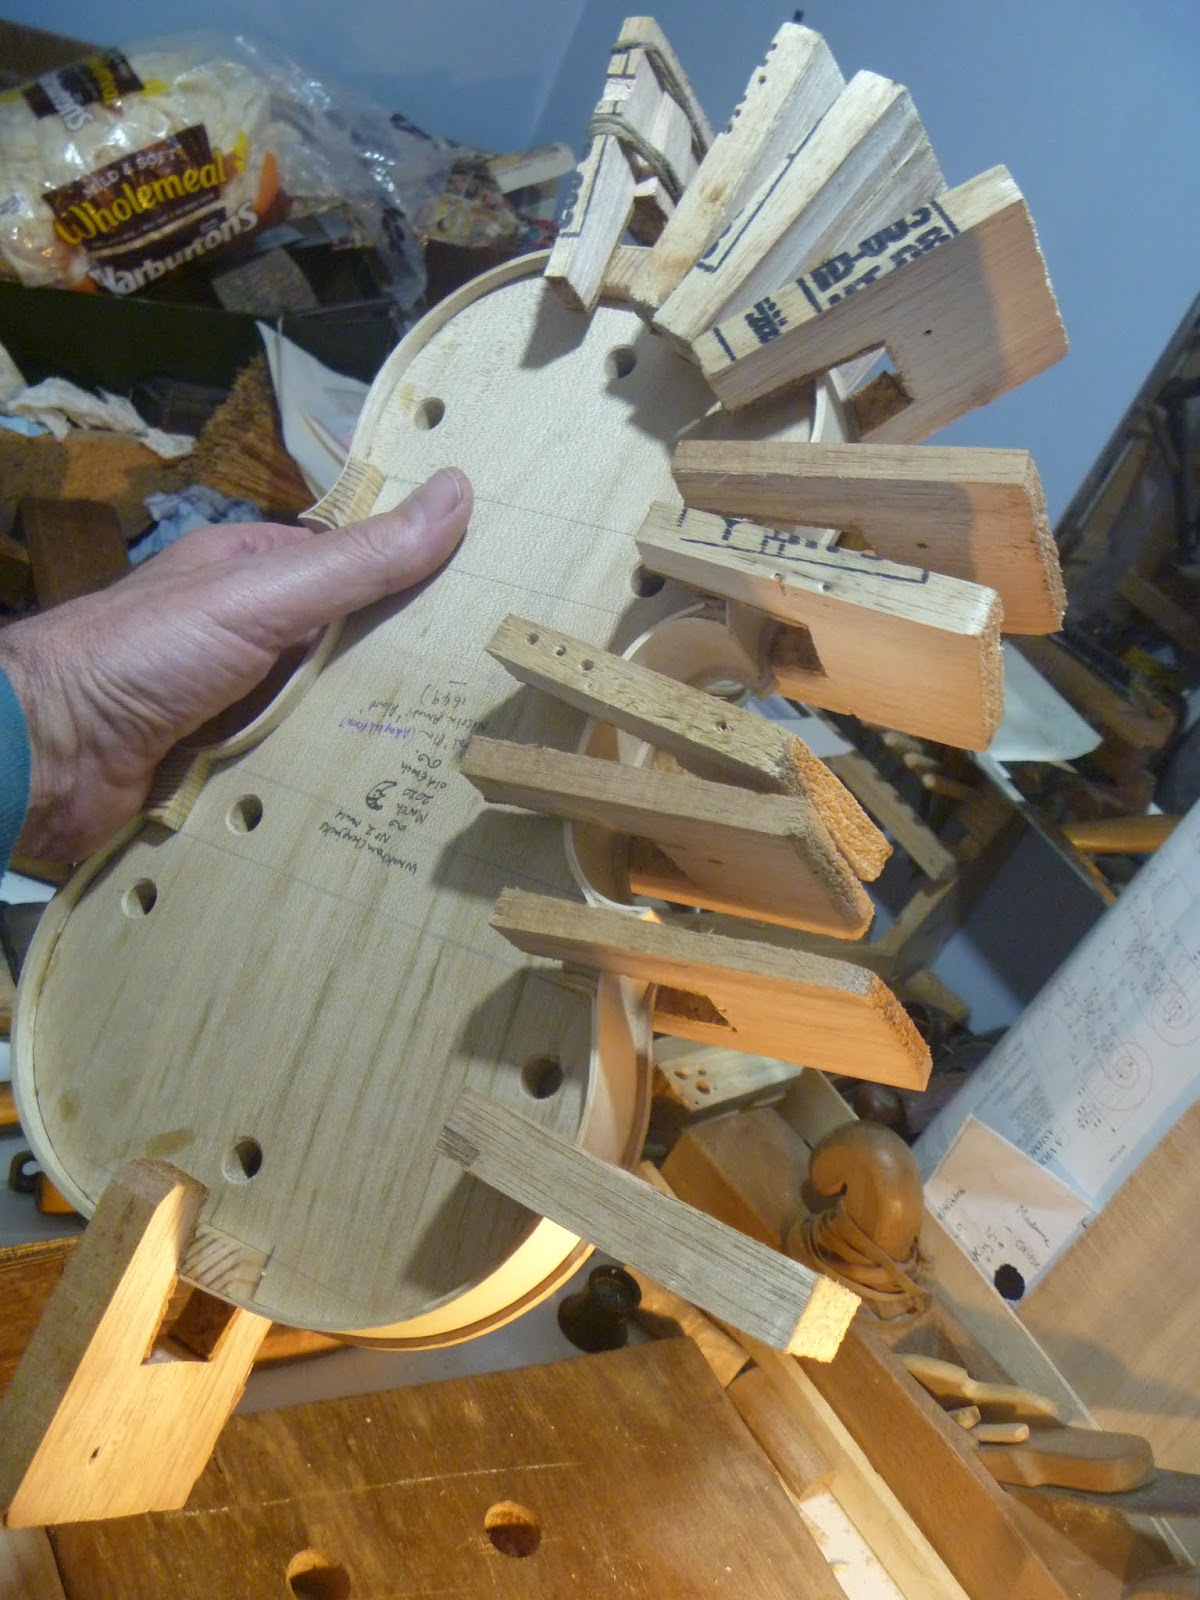
Day 15 (6thApril) Gluing the linings
On my crowded little table the bent linings can be seen along with a tin of home-made wooden pegs which hold the linings while the hot glue sets. The wooden skulls seem unimpressed with the disruption to their table home.

Here we can see my mothers old egg pan which I use to warm my glue in. I have got a full set of linings for the front of the violin glued and pegged in place.

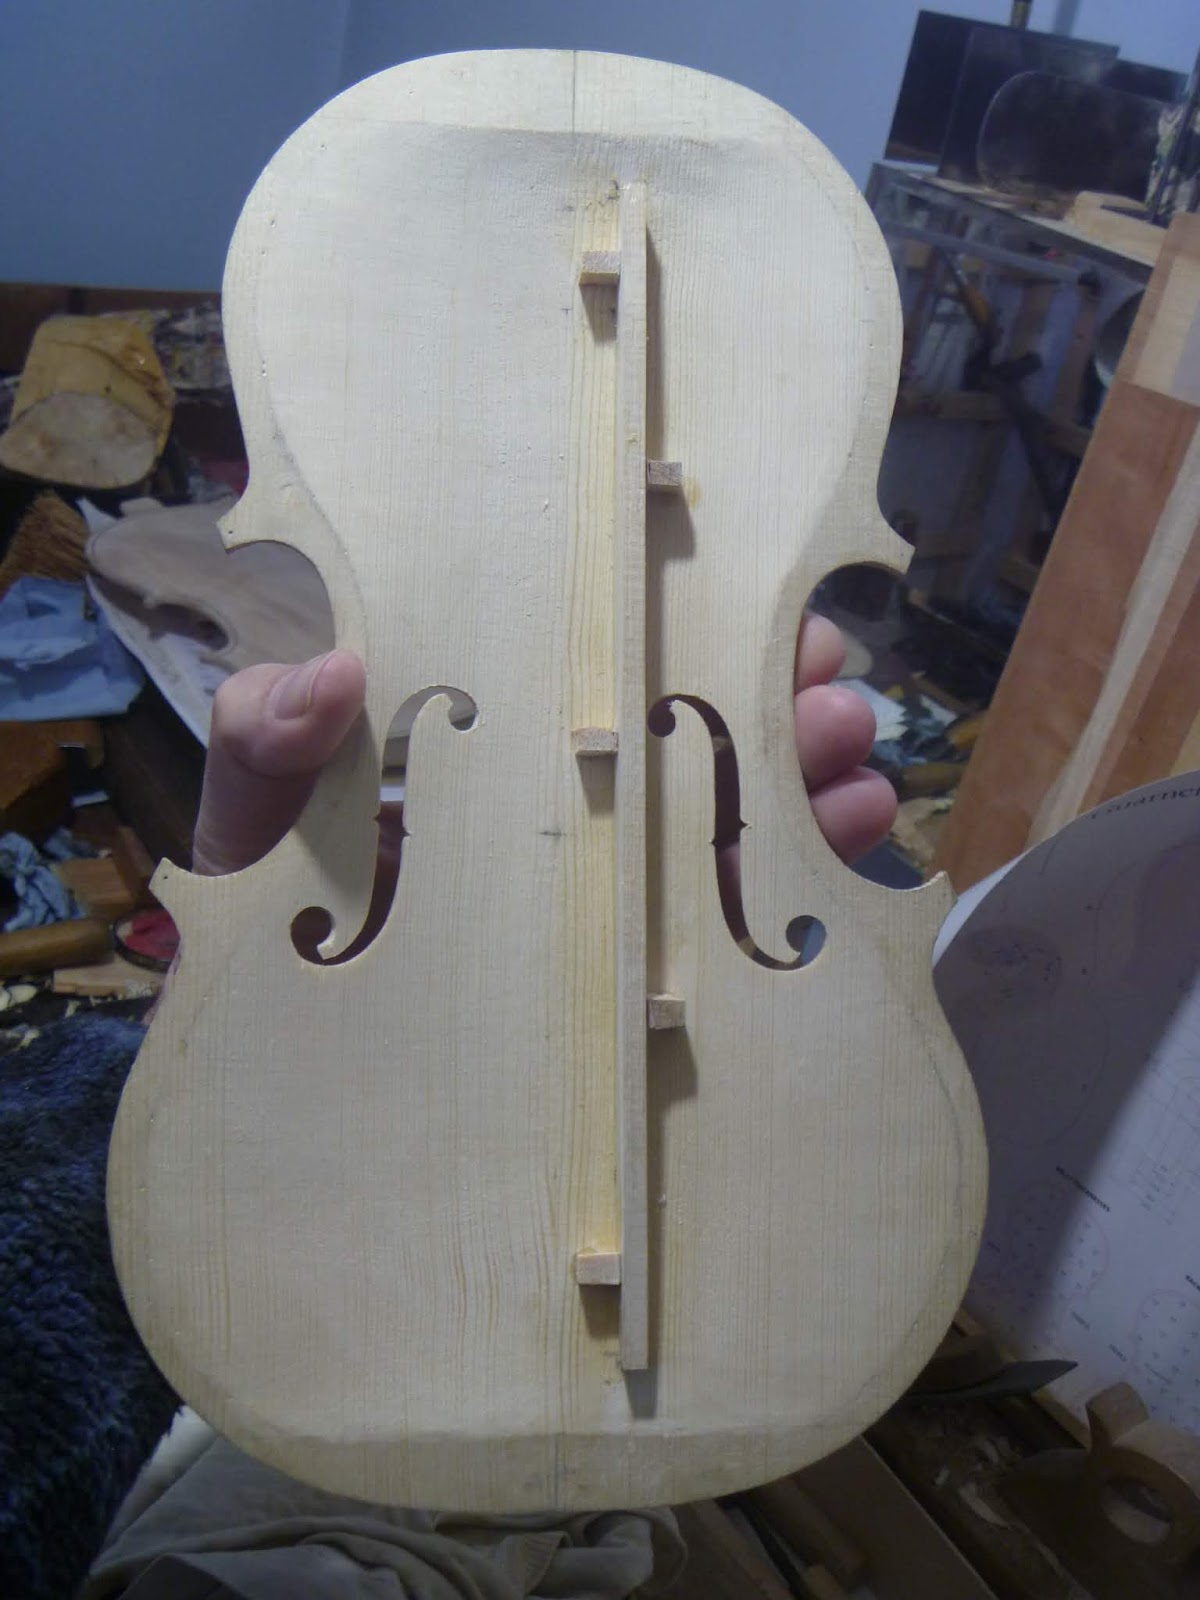
Day 16 (7th April)
Pegs removed and linings glued in place

On my walk, a nice rainbow outside a school - "be more kind". It looks likes a curved doorway into somewhere?

Continuing my walk the view of the Tyne from the top of Carrs Bank, through some overhanging Lime tree branches. At the right on the river you can just see the Millenium Bridge and undulating outline of Sage Gateshead

When I got home I used my knife to bevel the newly glued linings. making them tapered in section, taking care not to cut into the thin ribs

Day 17 (8th April) Beginning to make the Back
I have selected another bit of my churchyard sycamore for my violin back. I have planed the inner surface flat and have started to saw excess bits off

Day 18 (9th April) That old Chestnut
On my walk today I decided to walk the old route I used take daily to secondary school. I probably haven't been this way more than once or twice since then. I was looking forward to seeing a really nice Sweet Chestnut tree and was pleased to see it still standing majestically, quite hidden, off the front street.

Here I am using my home-made single iron plane (a rough copy of a plane left on arctic isle of Novaya Zemlya in 1597 by the crew of Willem Barentsz ill fated expedition to sail through the North East passage) to make the under surface of the wood for the back flat and smooth ready for marking out

Day 19 (10th April) Planing the linings and ribs level and to width
I am using this little smoothing plane as its rounded sides tend to catch less as it passes over the corners of the violin

Day 20 (11th April) Beginning the Soundboard or Belly
The violin belly or soundboard, like those of many other instruments, is made from Spruce. Violin makers are very particular about the wood for soundboards. Myself, I bought a piece of spruce that was "interesting" and was also a bargain because of the presence of a pocket of resin and the fairly irregular grain. Here I have sawn away the centre of the two wedges to eliminate the resin pocket and hope no other surprises will be emerge as I carve the wood away.

Easter Sunday
I've decided to stop numbering the days as there are some days that I didn't take any photos, such as Easter sunday but most likely I did do some work on the violin.
Egg Jarping
In my family we always looked forward to egg Jarping on Easter Sunday. If you don't know what Jarping is it has been described as a bit like conkers but with hard boiled eggs. The winner is the person whose egg's shell withstands the impact of a gentle sharp tap against the opposing shell. But there are no losers really as you get to eat your egg anyway after the jarping, unless of course you don't like eggs?
Wanting to jarp while still observing the guidance on 'social distancing' I realised I would have to jarp with myself. (I dyed the eggs - even though they were brown already - browner, by boiling them with onion skins just like I remember one of my grandmothers always did.) I held my egg in my hand and placed the opposing egg in the egg box and let jarping commence. Shockingly I was beaten not once but twice by the egg box!

(13th April) Joining the Soundboard
Most violin fronts are made from two pieces of spruce. One wedge of wood is cut down the middle and opened up like a book, the joining surfaces are then planed very very straight and flat and then joined together without clamps by applying warm glue and then rubbing the glued surfaces back and forth to form the joint. Here is my soundboard just after gluing, I spent hours planing it and it glued ok but I'm sure a violin maker would not be satisfied with the visible glue line. I could have used a modern metal plane but wishing to work in a historically informed spirit I planed the joint using a home-made single ironed wooden plane.

The wood is being held using a small add-on benchtop I fix to the top of my modern bench to mimic a woodworker's bench of the past. It uses various wedges, wooden pins and a notch to hold work instead of modern clamps and vices, this is part of my research into historical woodworking methods that I've been doing since 2001. If anyone, by some strange chance, is interested in more of this historical-woodworking-string instrument-making-stuff, they are most welcome to see my historical lute project here lutesociety building-lute-historical-methods

Perhaps it could be said that I was a Lute cobbler before adding violin making to my cobbling propensities?
(14th April) Establishing my Violin Outline
The outine of the violin is drawn a little larger than the ribs by the method shown in the photo, a washer of the correct size is used and the outline traced.

The outline drawn on the underside of the belly

15th April
On my walk I noticed this little plant growing out of a hole in the middle of the path, I feel I ought to go and try to transplant it?

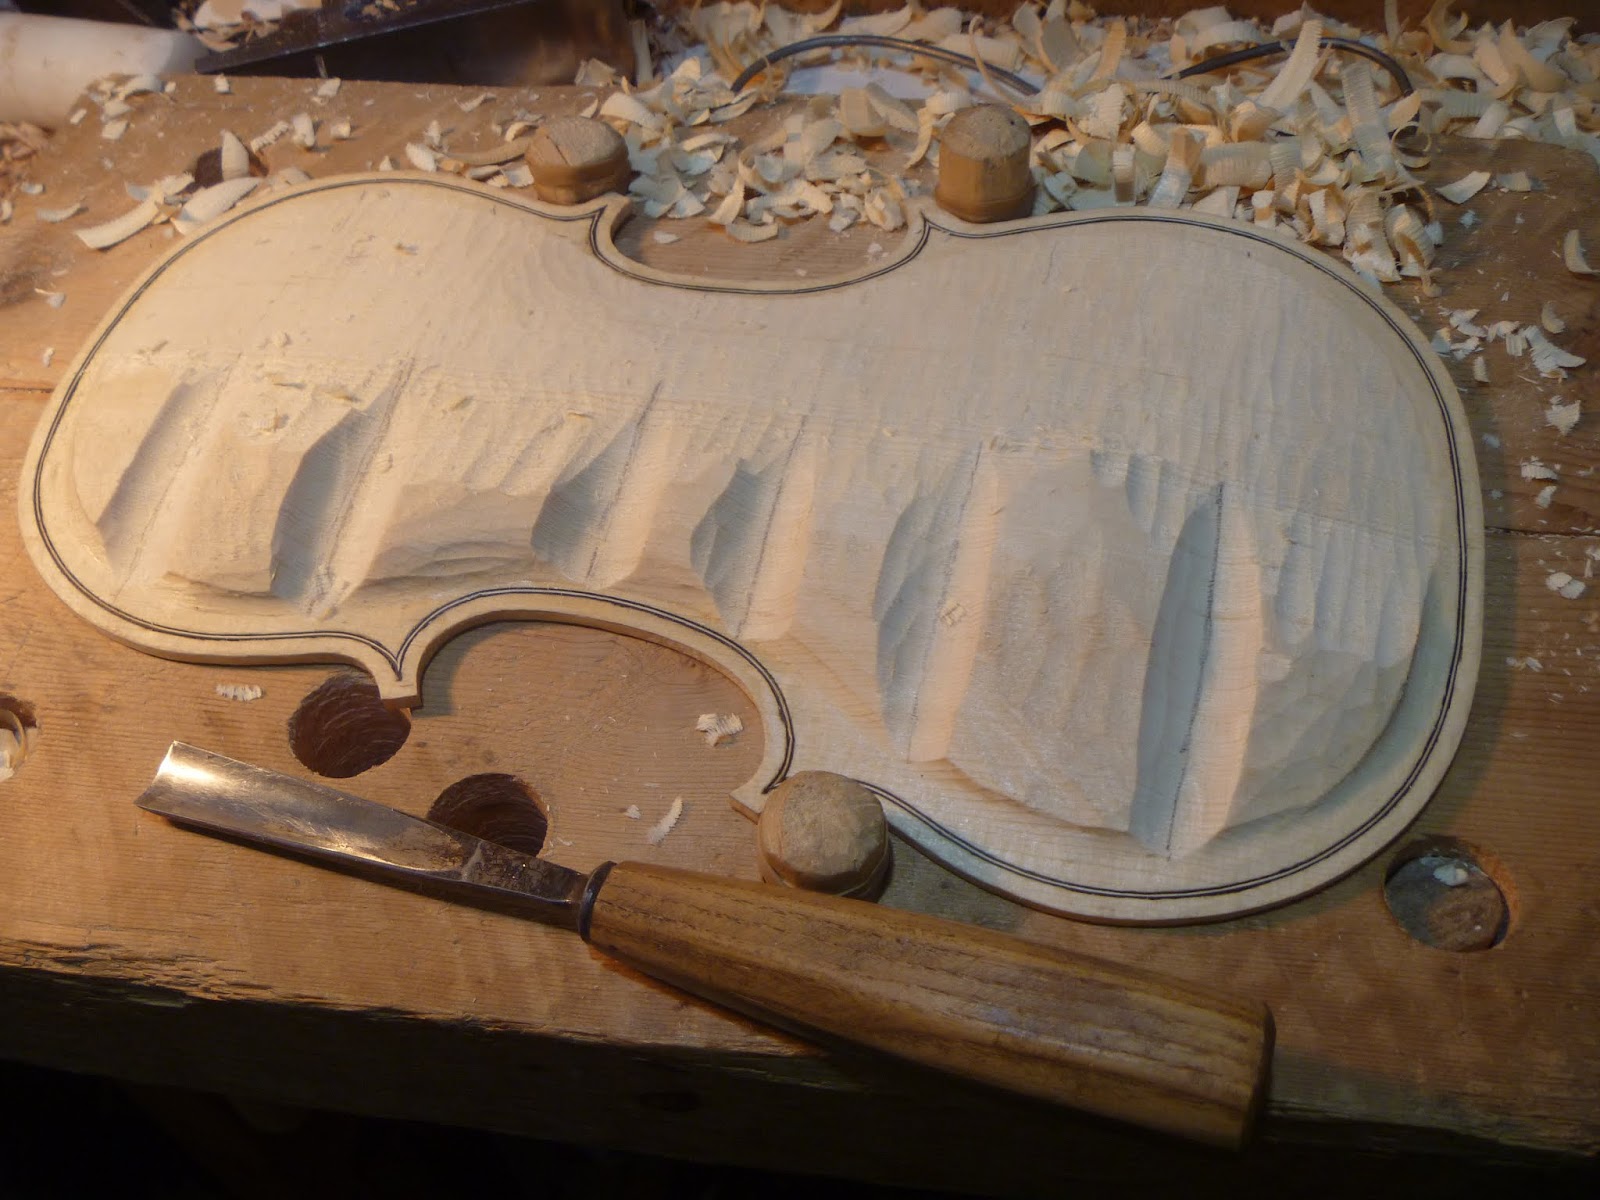
16th April Carving the inside first
The usual way modern violin makers work on their backs and bellys is to saw the around the outline then carve the outside of the instrument first, usually basing this on detailed plans and measured contours of famous instruments. A few makers believe that in the past some violins may have had their internal arching contours made first then the outside then sort of follows from the inside? I have chosen to carve the insides of my violin first and let the ouside contours take their shape largely from the inner surfaces.
Here is my violin soundboard with line drawn inside the outline to help guide my carving
Here I am using a lage gouge to scoop out wood. The wood is not clamped down but worked resting against wooden pegs/stops

I have got a violin plan on the bench and am using a ruler and my eye to help me get my internal arching/carving similar to this

I made a little depth gauge to allow me to test the depth of my arching. The whittled peg is calibrated in eighths of an inch.

17th April The Beatle then The Shadows
18th Century Beatle?
I often look at the old gravestones when I walk though the churchyard. I like the shapes of their tops and I really like the handcarved lettering. Whenever I look at them I notice something new or that I have forgotten. On my walk today I saw this gravestone belonging to George Harrison. I like the way the lettering has little insertions above the line. It makes me think that whoever carved it was not a great user of pen and paper but could form nice individual letters and wasn't too worried writing NO
Vember. George Sturt in "The Wheelwright's Shop" writes of a wheelwright who when painting farmer's names and addresses on finished waggons seems to have memorised the shapes of parts of words and one day, forgetting one, said to his workmate, "Let's see Gearge,...blest, if I ain't forgot how you makes a Sway!"

Another old Chestnut
A bit further on my walk I discovered this very twisted old sweet chestnut tree. I have been along this way many times but seem to have the time to notice things at the moment

The Shadows
Back to the violin. Here I am using the shadow cast by a staight edged piece of wood to help gauge the shape of the long internal arch shape of my violin top

Here I am doing the same but across the top.

18th April Sawing the Soundboard outline
The inside of my violin having been carved,planed and scraped well enough to my untrained eye I then sawed around the outline. I have to admit to using a modern coping saw as I didn't want to risk tearing the wood too muck with my home made bow saw's coarse blade.

19th April Starting to shape the outside
Here I am planing some excess wood from the belly

Sawing some excess wood off the back apologies for the use of modernish saw and vice.

Amati's Axe?
If you, like me, wonder what kind of vice and saw, early violin makers
Andrea Amati or Gasparo Bertoletti, may have used, obviously we will never really know
but they could maybe have used equipment like this Bench and Tools of 1561?
(This little article is in one of the FoMRHI Quarterly publications. If you are interested in musical instrument making, FoMRHI is an organisation which is well worth further investigation and becoming a part of!)
20th April Front, Back and Sides
No, not a request for a haircut. Here can be seen the internal carving of my Violin's front and back on either side of the sides.

22nd April Old Willow tree
I came across this nice knobbly old willow tree when out for my walk today.

It is old but maybe it is younger than it looks? It has nice characterful bark.

23rd April DIY Purfling Blades
A violin usually has very thing strips of wood or Purfling inlayed around its body edges. I had no blades for my purfling tool (used to mark the groove for the purfling) so I cut a piece of steel off a scraper and sharpened them and was quite pleased with the result .. for the moment!

25th April Refining the Outline
I used a knife then a file to refine the outline of the sawn out violin belly.


26th April Sawing the back outline

27th April Two Captains?
On my walk today at first I thought I was seeing double! These pictures were fixed to a garden gate.

I have at this stage also refined the back outline and show here the, hopefully, nearly finished inner surfaces of the soundboard and back

then their very roughly shaped outer surfaces

28th April Preparing for purfling
Here I have marked the final edge thickness on the soundboard and the wood will be removed down to this line can start marking out for purfling

29th April
Here the back's edges are being carved to near final thickness

30th April. Famous composer* and An Awesome Ash tree
The edges of the belly will be chiselled flat up to the pencil line ready for marking the purfling

On my walk today, I've often seen this little headstone, nestling near the churchyard wall I think it has a lovely freeness in its Lettering and carving

*William Shield family plot?
I forgot to mention that when I looked at the name on this little stone and a couple of others nearby all had the family name Shield. Just next to this is the small monument to the local composer William Shield who is buried in Westminster Abbey
In the park a big old ash tree, near the old windmill, it looks like a headless giant with upraised arms.

After my walk I used a flat gouge to get the edges of the belly and back ready(ish) for marking the purfling

1st May
Here I am getting ready to glue up some white and black veneer to make my purfling. the white veneer is a bit split but I think it should be ok as it will be sandwiched between the two layers of stained black veneer. I have a piece of glass on the bench on which I will perform the glueing of the veneers.

Thin glue is applied to the edges of the soundboard. The grain lines of the spruce are alternatively hard and soft and the glue hardens the soft bits up to help make the wood surface respond more evenly to the small blades when marking the groove for the inlay

2nd May
For inlaying the purfling, a very narrow chisel is needed to clear the wood out of the grooves the veneer strips sit in. I used an old broken small drill bit, shaped on a coarse then a fine sharpening stone to attempt to make one. The high speed steel of the drill should hopefully hold a cutting edge.

I made a handle for my purfling chisel blade from some scrap (I discovered later the handle wasn't the best shape) and fitted the little blade in a hole made by a bradawl

I practiced using my purfling cutter and chisel on some offcuts

Here I have the glued up strips of black and white veneer ready to make my thin lines of purfling.

3rd May. Human bumble bee?
My amarylis plants were in bloom on my kitchen window. Occasionally small beads of nectar drip out of the trumpet-like flowers onto the leaves below and I take a strange pleasure in tasting these 'precious' sweet droplets.

Making new Purfling cutter blades
I discovered the blade I had made earlier were too flexible so decided to make some thicker ones from some knifemaking steel that I had. Here I am sawing a narrow strip off for the blades.

I cut the strip in two and filed cutting points on each half.

The blades being small could be hardened and tempered in the kitchen using the long suffering gas cooker

Quenching the heated steel

I cleaned off the quenched hardened blades on a stone (testing them for hardness by scratching lines on a empty bean tin) and then heated them gently, aiming for a 'straw' tempeiring colour before quenching again in water. i have tried to show the colour here.

4thMay. Purfling a real challenge to a violin cobbler!
These were then sharpened and tested and were much better than the ones I first made

Here I am starting to make the purfling groove on the back. I must admit I was struggling and can see why my economy violins of the past had inked on on purfling. This is the hardest part of the whole process so far.

5th May
I was struggling on and my groove was becoming too wide but I thought it would be acceptable .. for a violin cobbler!

6th May. Working in the sunshine
I sat and worked in my front doorway, to get a bit of sunshine, with my small portable work board on my knee.

The natural light was much better than that given by the small window and lightbulbs of my workshop

My front garden is not very manicured but the bluebells are nice and the bees seem to enjoy it.

My glueing of the veneers for my purfling was quite imperfect. I used an old iron to re-melt the glue and hopefully improve the bond. It seemed to help a bit. I have had trouble gluing veneer stacks before If anyone has any advice on this I would welcome any suggestions?

Disaster strikes!
I
had nearly finished and tried to cut the groove at the top of the back
near the Button and my natural inclination to try to rush things
surfaced. My hurrying had already resulted in a wide groove but my
carelessness here caused a widening and irregularity even I couldn't
accept.
7th May. A new day, A new back.
After some deliberation and a night of interrupted sleep, I
decided to make another back. Luckily I had two other pieces of
churchyard sycamore cut from the same wedge of wood (seen here under the old back) so I chose one and
started preparing a new back. I will try to salvage the old back for something -maybe try to build a violin as is thought was done by Brescian makers, building a violin on the back, without a mould, and camouflage the wide irregular groove with some decorative "feature" or other ?
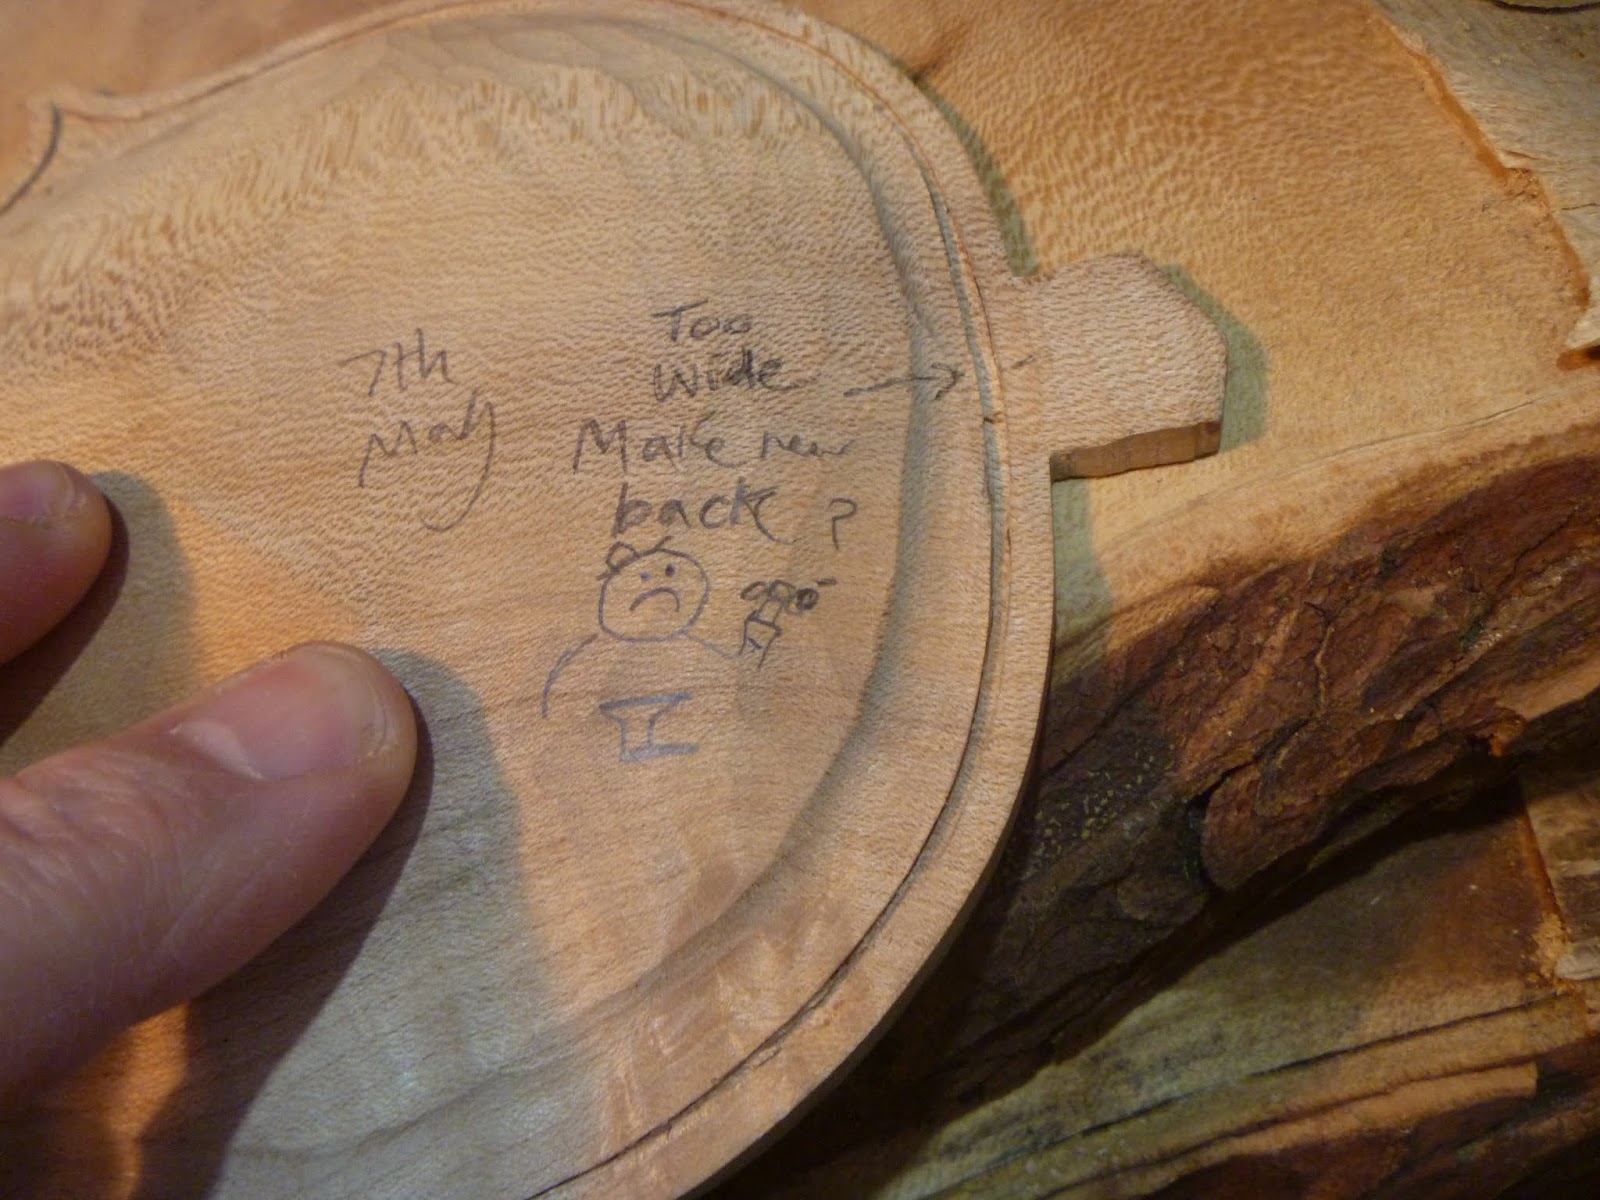
Back number two!

8th May
Sawing some excess wood off back number two

9th May
On my walk today some Sycamore flowers

Then some Hawthorn or Mayflower. One of my favourite things when cycling during spring is riding through the scent of Hawthorn blossom from the hedges.

Some newly opened beech leaves. When they first open they look very tender and unblemished

Some less recently opened Lime leaves

Some Elm leaves. Despite the dutch elm desease lots of small shrubby young elms can be found possibly coming up from the roots of felled deseased trees?

Hollowing the inside of the new back

In the later stages of hollowing I was trying to keep the gouge's bevel in contact with the wood, rather like the way a flat/scandinavian bevelled knife is used. Gouging this way seems to let the bevel angle of the tool to 'decide' the resulting arch depth and profile?
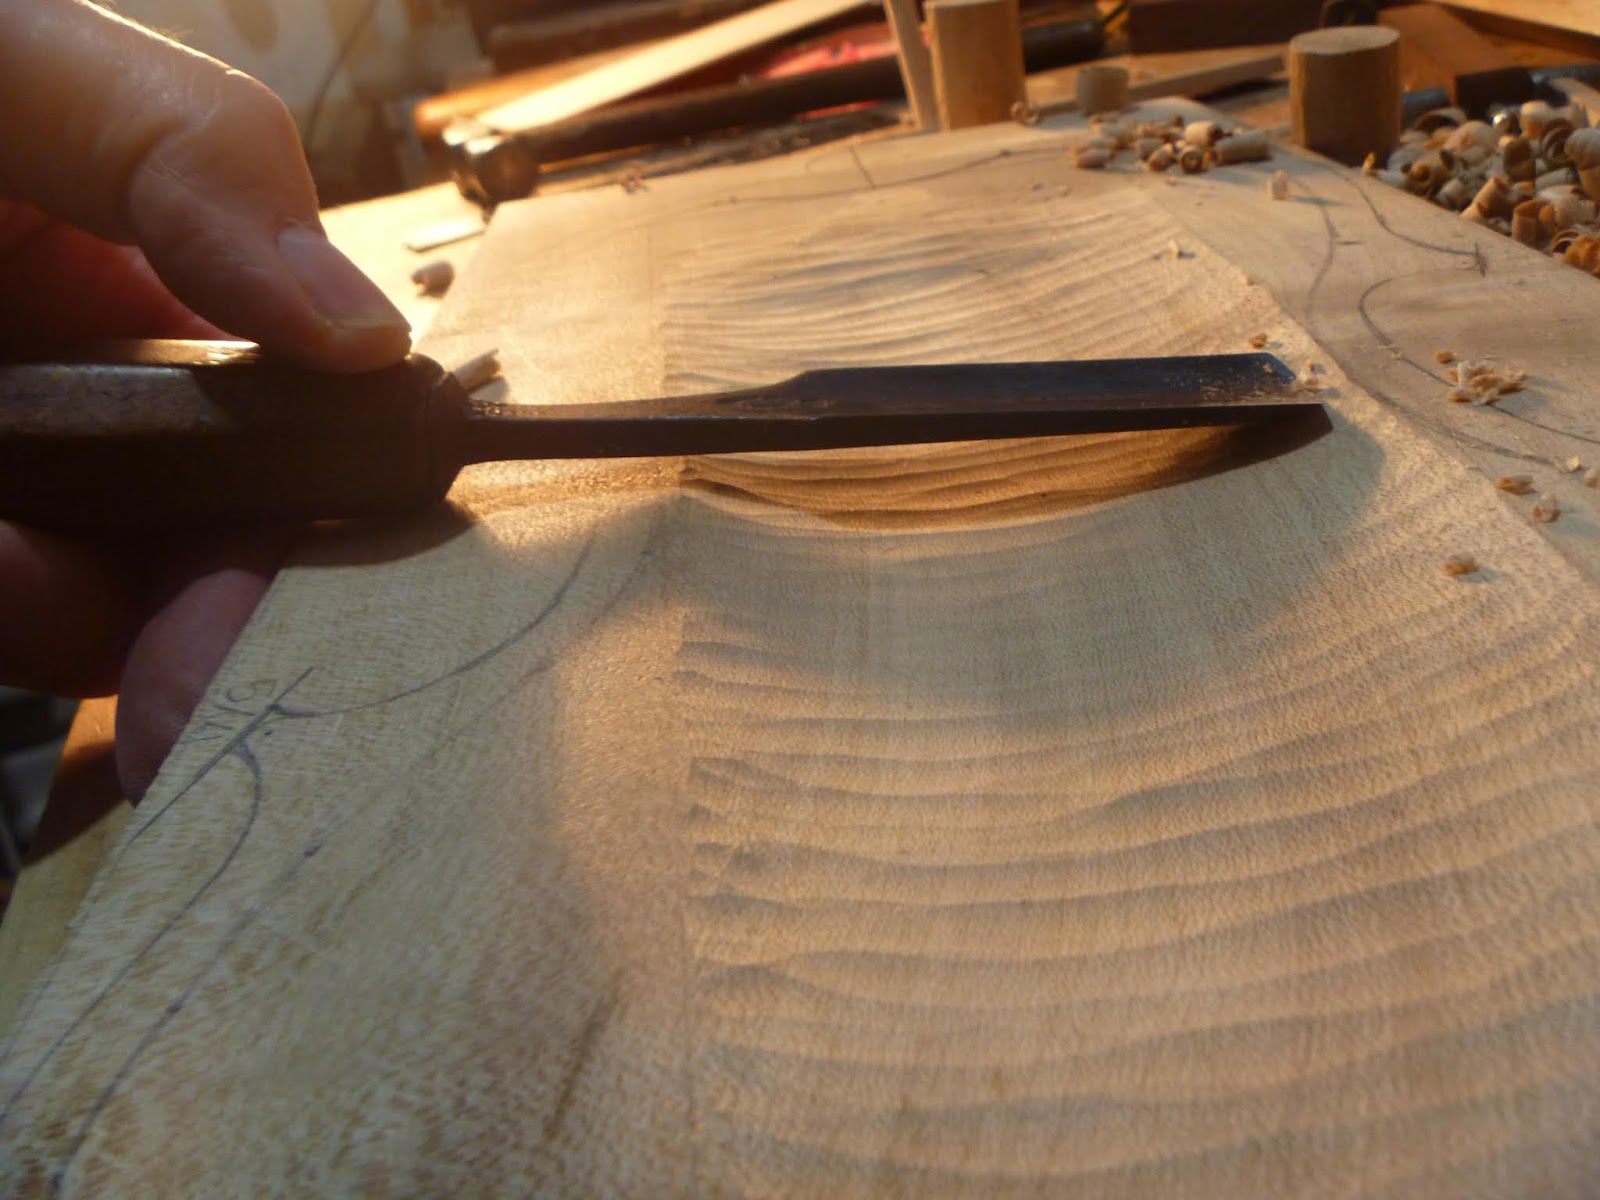
Curly gouge chips

10th May. Planing off Excess wood

11th May. Indestructible Trousers
Today I was trimming a very overgrown hedge in the garden as a neighbour had called around and drawn my attention to some unruly shrubs and in a careless moment my axe glanced off (the headge not the neighbour!) and made contact with my left shin. Luckily I happened to be wearing some very heavy duty german carpenter's trousers and just received a small bruise thing. I must always be careful and wear these trousers when using an axe! The axe head is a handmade old one I believe it is a Sussex type of axe shape?

Back in the relative safety of my little workshop I continued working on the new back

12th May
I used my knife to refine the outline of back number two, shown here on top of the first back.

13th May. Work Safely
"Now I've got may plane sharp I supposed I'd better get back to work! No rest for the wooden!"

"With my face covering on I should be ok. Apart from all these viruses going about, It can be quite hazardous inhaling the wood dust emitted from my stiff knees!"

15th May. The imperfect Purfler
I am here at the stage where things went wrong on the first back. Luckily I did a little bit better this time. My groove is still too wide and the edges ragged. I do hope that if any real violin makers - or even real cobblers for that matter- stumble across this blog they will not find my efforts too painful to look at?

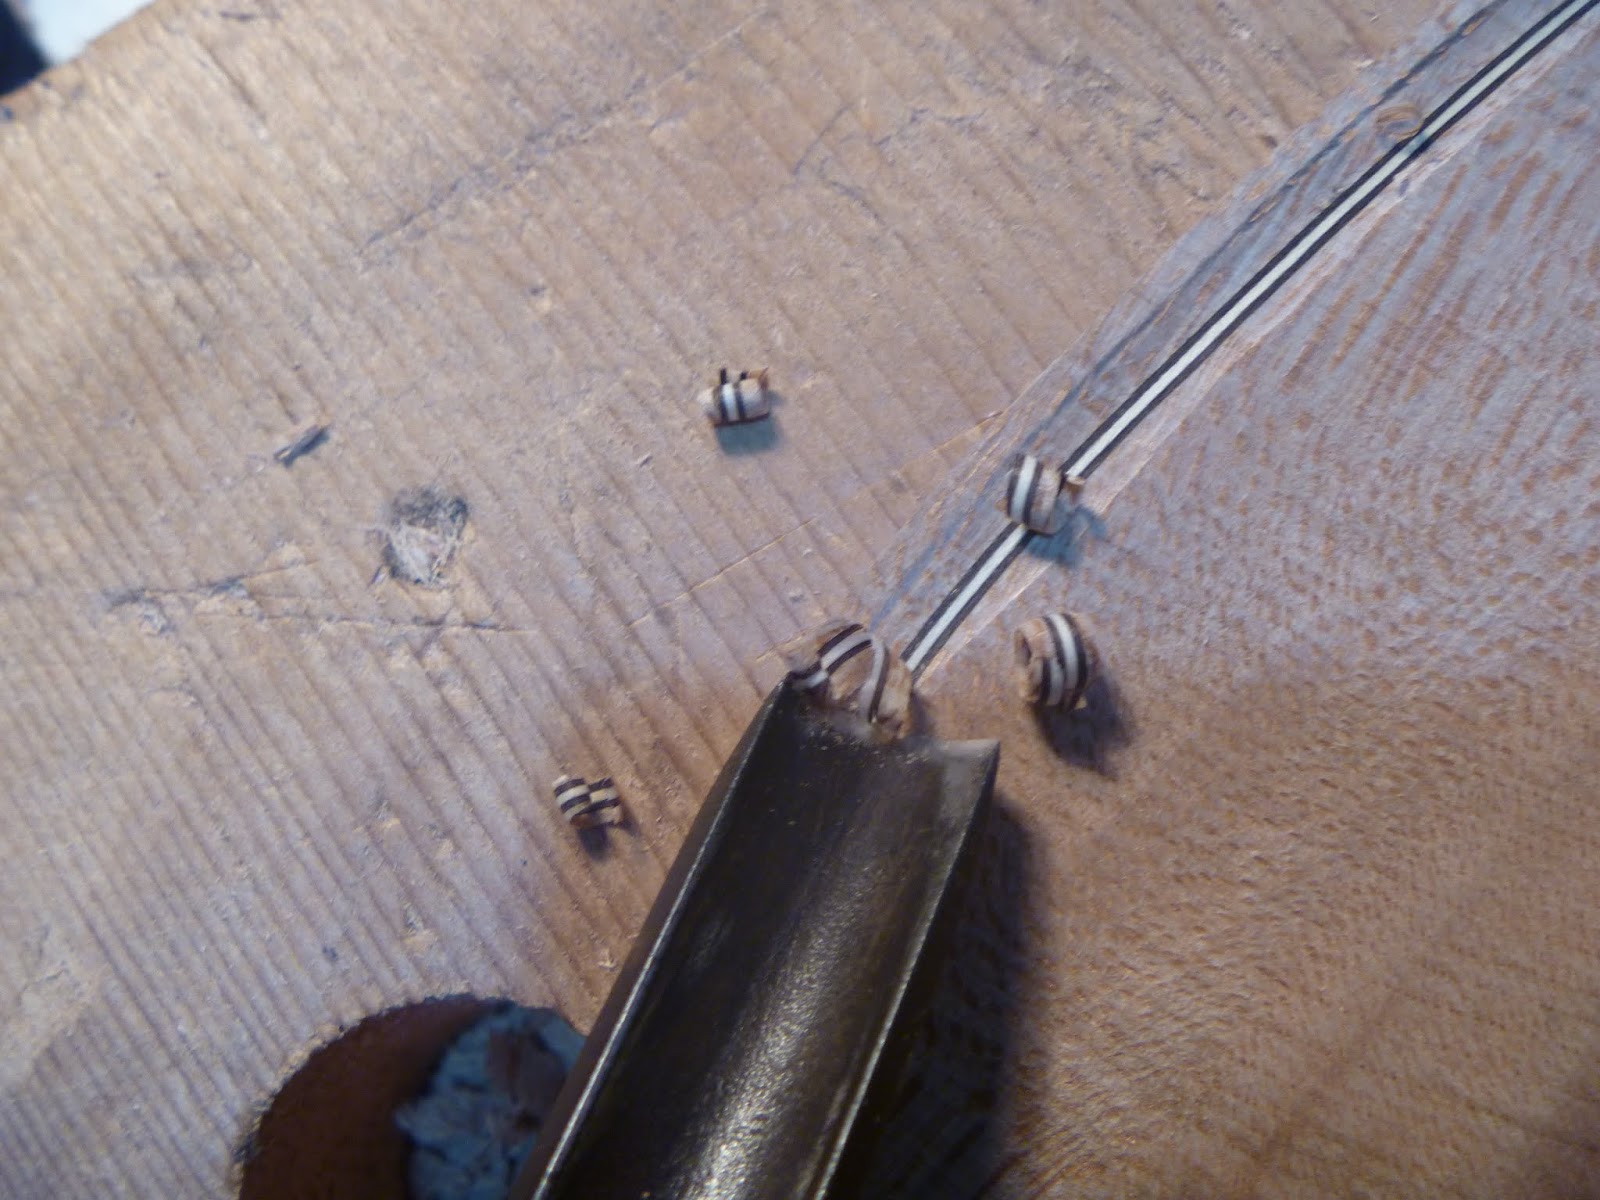
16th May. Purfling at last
With my groove cut in the back I am finally ready to start on the fitting and gluing the purfling. The picture shows an old cabinetmaker's panel gauge adapted for use in cutting my glued up purfling veneers (don't worry no old tools were harmed in this process, I just made a shorter 'shaft' for the tool along with blade and wedges which were missing - the long original shaft is somewhere on the bench, I think)

The cutting guage in action

The gauge works well , nicely cut strips of purfling at about two and a half millimeters wide and 1.8 mm thick (3x.6mm veneers stacked up). This should have been scraped down to 1.2 mm thickness, thinning the black veneer layers but as the grooves I had made, due to winning combination of carelessness and inexperience, were quite wide I left the strips unscraped. I think this may have caused problems later during bending as the thickish layer of veneer tended to buckle a little on the inner surfaces of the curves, a tendency which may have been less in a veneer of reduced thickness?

Spanish inquisition?
No, not the instruments of torture, these are the tools I will use to bend and fit my purfling arranged artistically next to my kitchen sink

The warm glue is applied to the groove and the purfling is fitted quickly before the wood swells. My imperfect purlfing was coming apart especially after bending but I managed to get it in the groove

Using a small hammer to tap the glued purfling into place

The first sections of purfling glued in place. I used the pins to try to push the purfling into the corners while the glue set. Sadly the imperfections of my groove cutting are quite evident, although it did look a bit better after I trimmed off the protruding parts of the veneers after the glue dried

17th May. Attempting to Iron out problems
In attempt to imrove the adhesion of my purling veneers I though tit would do no harm to try the hot iron again

followed this time by the concentrated pressure of a veneering hammer, it seemed to consolidate things a bit so was worth a try!

Purfling bent and ready to glue. I scraped the bent purfling a little bit thinner on the bottom to make it easier to fit it into the grooves during gluing.

My poorly cut grooves meant the purfling kept popping out when dry fitting it so I used a couple of wooden peg type clamps to hold it in place so I could get the length finalised and cut it to fit.

Back in the kitchen, the lower bout purfling glued in place.

May 18th Tea Delivery!
I was coming close to running out of tea and the day was saved when six packets I ordered arrived in the post. I keep my supplies of tea in a very large teapot (unfortunately it only holds five packets)

May 19th
If you look back at 6th March I show a picture of an old lime tree in the local churchyard. Here it is again, in full leaf now on a sunny evening.

Tree leaves and weather lore
The leaves on some ash trees are just opening now. The difference between a splash and a soak is debatable but the old weather proverb "oak before ash we're in for a splash, ash before oak we're in for a soak" suggests we are in for a dry summer. Unless, of course, the splash is a big one and I noticed the leaves on some ash trees opened a while ago so the proverb will be true whatever happens.

Here are the front and backs of my violin with competed, imperfect, purfling.

May 20th f hole drills
Having traced an f hole from my plan I selected two silver steel bars (hardenable steel which I had bought last year) of a suitable size to make 'drills' to cut for the circular end parts of the holes

I had made a trial drill last year and had difficulty in centreing the holes in my bar as the thin drill tended to wander so I thought a simple jig would maybe avoid this problem. Here I am marking out some steel to hopefully act as a guide for the thin drill

I drilled several holes so my jig could accomodate several different sizes of bar

Here the drilled plate has been attached to a wooden base and hole are drilled through the plate with the same small drill bit

The holes in the wood can then be enlarged to suit the size of bar to be used for each size of f hole drill

The drill guide in action, drilling a hole, hopefully, in the centre of the silver steel bar

The jig worked reasonably well and with some persuasion the holes drilled were reasonably central. Unfortunately the wobbling of the drill in use caused its sides to wear the steel plate of the jig so it couldn't really be reused.

Three sizes of bar drilled reasonably well

May 21st Forging ahead!
I sawed the drilled ends of the bars off at a size that I thought would be suitable to forge into tangs to fix into handles. I didn't realise at the time that I should have probably forged the tangs first on the long bars then sawed these off and then drilled them.

The Merry (Masochistic) Blacksmith!
I
was soon to remember short bars are awkward to handle when attempting
to forge them - especially if the would-be blacksmith doesn't have the
correct tongs! Long bars can be poked into the fire into the right place
and are ready to be retrieved and worked, short bars need to be fished
out of the fire but possibly can be heated quicker - important when
using a very small forge improvised from an old biscuit tin! - due to
the absence of the heat conductivity of the sections of the long bars not in the fire.
An Anvil, biscuit tin, bellows and charcoal are all you need?
Also visible here are a very inadequate pair of much misused old gas-fitters pliers used for tongs with an elastic band on the handles to make them hold onto the small workpiece.

After much struggle I managed to form a rough tang. The short pliers meant a gardening glove had to be used and still the pliers got too hot to hold

Alternative uses for a Biscuit tin
As my hand was getting kebabed on the hot pliers handles I thought I would risk losing the small bars by placing them in the charcoal and found they could be heated much more efficiently and they didn't get lost. This meant also that I could heat more than one workpiece, as a proper smith does, one or more heating while the other is worked. The drilled bars can be seen here in the hot charcoal

Here the drills can be seen on the old lumpy anvil with their forged tangs, a bit rough but are good enough to put handles on. I was getting better by the time I did the middle one.

A sophisticated setup
Here is my improvised forge on the garage back step.

The Elephant in the room!
An elephant in my front room

I put the forged drills back in the hot charcoal so they would cool slowly in the embers. This slow cooling should anneal the metal and bring the steel to its softest state. The tool steel I used is still harder than mild steel even when annealed. Here I am retrieving the now cool bits of metal.

I first used a hacksaw to start shaping the cutting parts the drills

A v shape of metal is first sawn out

Followed by a round file

The cutting edges are shaped and sharpened with curved abrasive stones.

May 22nd (After midnight!)
A central pin to fit the hole I drilled is cut from some steel wire

The outer end of is filed roughly domed and here it is in place. The pin is removeable so the drill can be sharpened

To test the drill on a piece of thin spruce I use an awl to make a pilot hole for the pin

Rotating the drill by hand a circle can be cut. working half way through then completing the hole from the other side

The drill worked well, despite the pin being slightly off centre, and cuts a nice clean hole. The circular waste piece is visible below the drill

Comparing the test hole with the traced f hole pattern and it matches quite well

May 22nd (Daytime)
Some roses from the front garden. Their scent is much better than my flower arranging skills.

I used some wood scraps to make handles made for my f hole drills
May 23rd Stradivari style calipers from scrap
The completed drills and test holes. they look rustic but seem to work quite well

I needed some thick wire as I was going to try to recreate some thicknessing calipers shown here in a book and are said to be part of Stradivari's tool kit. I looked around and this old bucket handle seemed to be suitable

Here are my sketches - done to work out my ideas, sizes and construction details - and a previous version of the calipers I made in 2015. They were not very good as the fencing wire I used to make them was too thin and flexible. The bucket handle has been straightened out and lies on the drawings

May 24th Making the calipers
I heated the wire to try to soften it as I didn't want it to snap as a result of work hardening due to the previous bending then my straightening it. Also I wanted it to bend easily and uniformly.
Here the wire has been sawn in half and the ends that contact the wood filed smooth and slightly domed so as not to scratch the workpiece

The wire is bent cold in a vice using hand pressure then a small hammer.

Here the two bends, seen in the Stradivari calipers that I am copying, have been made. When making anything the order of working always has to be considered carefully to avoid inconvenience. I thought these relatively tight bends were best done first.

Pythagorean Hammer or Wagner's anvil?
Gently hammering the curves of the calipers around the beak of the anvil. The ringing of the anvil even with gentle hammering must have aroused the neighbours curiosity. When making my f hole drills I had put one foot on the beak of the anvil to dampen down the ringing as I was hammering quite hard then. I was quite disappointed to see musicians using metal plates instead of real anvils here Das Rheingold also note the use of joiner's claw hammers instead of metalworker's hammers! I feel Pythagoras would not have been impressed, see Harmonious Hammers
My anvil rings at a slightly sharp E note!

Here I am hammering flat the section where the pivot hole will be drilled

The roughly shaped calipers

The flattened middle section. I decided to continue the flattening and hammering a bit further out from the middle as I thought the work hardening would help stiffen the calipers

Drilling the pivot hole

A salvaged old nail cut down for use as the pivot rivet

Filing the pivot/joint area reasonably flat and smooth

The finished calipers after riveting the two parts together. They needed to be bent a bit gently by hand to finalise the shape ready for use

I made a small wedge of wood to use to measure the opening of the calipers when in use. I used a steel rule to calibrate it in millimetres. The wedge wasn't perfect hence the slanted lines (not perspective) but I hope it will be accurate enough?

The calipers and measuring wedge in use on the violin back - just over 9 mm, A lot to come off here!

"Inside first" method
I decided to thickness the back first to get the hang of things before starting on the probably more difficult soundboard. This is a bit of an experiment as the outer contours are being wholly dictated by the previously done internal contours. Actually the whole thing is a bit of an experiment for me! Here is the back on the workboard

May25th (after midnight)
No disasters so far. I am trying to supress my violin cobbler tendencies and probably being a bit over cautious in wood removal. I suppose it is best to take care and be more bold as I gain experience.

May 25th Sunset
The sunset was nice and red tonight, here is a view over the Tyne valley. I tried to get a better view by climbing up onto the big stone gatepost structure at the south entrance to the chuchyard

Harry Clasper's monument at dusk

May 26th
Here I have marked thicknesses, measured with the calipers, on the back. I am working cautiously and probably taking more measurements than necessary

May 27th
Using a small plane to reduce the thickness and even out the gouged surface

Here I am Sharpening the little plane iron. I like the way a previous owner has carefully made the wooden box uneven, following the irregular shape of the stone

Another home-made plane. My own version of an old Dutch type of whale shaped plane

I have used a pair of very modern looking compasses to mark a line around around the edge of the back to guide me when gouging all the way around

The gouging creates the raised edge usually seen on violins
May 28th
A shallow channel has now been made all around the back apart from the corners

The inner edge of the channel is chiselled away to refine the contours of the back a bit more and to reduce the thickness of the wood near its edges. Here, it has been brought down to around 3mm

Nature making a comeback
On my walk today I noticed this little Sycamore tree making a break for it and coming up between two paving slabs. I wish it well but with people coming increasingly back out onto the streets I think its days are numbered!

The leaves are out now on the big poplar tree I mentioned above - back on April the 1st. If anybody is reading this, and knows, can they confirm for me that this is a native black poplar - well, it's worth a try. These are the specially rustley leaves I mentioned earlier.

I noticed that some hawthorn blossom is pink. I wonder if I pollinated any flowers with my nose when I sniffed their scent?

Another little tree, this time a beech, near the park wall, maybe a year old, I hope it may be overlooked by the gardeners for another year or two.

A Honeysuckle flower, one of my favourite scents of summery evenings. This one was planted by my mother next to the front door. When the flowers are out I encounter the scent every time I empty the leaves out of my teapot onto the garden and it is always nice.

The back has been planed and scraped and is nearly finished, for now.

May 29th Oak Apple Day Today!
I was out on my bicycle today and noticed 'drifts' of thousands of seeds by the road, in the gutter, they looked like elm seeds. I looked around and could see a middle sized elm tree nearby in a park. Here the seeds can be seen on the tree. I took a couple of handfuls home to try to plant. I cycle this way every time I go to and from work and have never noticed this tree. I don't know if it is an english elm or wych elm but believe wych elms were more common up here?
 |
| Elm Seeds |
"I would fain doff my hat before such a" tree
For my heading, I have stolen this slightly altered phrase from Walter Rose's "the Village Carpenter" see Here
Lady companion tree wanted?
This old poplar has got to be one of my favourite trees. When I was a child there were at least three of them near to each other, now this is the only one left. This is a male tree. Apparently female trees were not planted very often as they produced lots of cottony seeds that got onto the farms clean laundry when it was hanging out to dry. I would really love to get another tree especially a female to keep him company in his old age?
 |
| Nice Old Poplar |
Deep fissured craggy bark on aged poplar tree.

I checked on the hole in the path with a little plant growing out of it that I saw on the 15 th of April. No sign of it, maybe some else took pity on it and has transplanted it?

Duckpool Lane
On my way home from work I always push my bike up this bit of un-made road, we are both getting a bit old to ride up such hills - nearly home.

Here are the leaves of my little mullberry tree, the small green bobbles will become small black mullberries. The berries are small as the tree is still in a pot, I need to find somewhere in the garden to plant it but it may get too big.

Here I have gouged several channels down to near the finished thickness of my soundboard.

May 30th (After midnight)
The wood between the channels can then be removed fairly quickly without having to worry about measuring the thickness
May 30th
With the bulk of the wood removewd the soundboard can be taken down to near finished thickness, measuring frequently using a combination of calipers and feeling for lumps and thick areas using thumb and fingers

May 31st
Like I did with the back, a channel is is gouged around the edge

After much scraping and measurement I am nearly there.

Here are some shadow lines showung the almost finished contours of the front then the back. I am quite pleased with them but I have to admit I do not have a very refined eye.


Shakespeare Original Pronunciation and Woodwork
I do like the idea of trying to make things in a way that explores possible historical working methods. A while ago I was listening to the radio and heard a program about Original Pronunciation Shakespeare. The presenters explained that by using what was believed to be the original pronunciation many puns and rhymes work better than they do when pronounced in a more modern way. This experimental approach to Shakespeare can enhance our appreciation and enjoyment, adding to our experience. I couldn't help thinking that in a similar way, attempting to make instruments in a similar historically informed way, using 'original' tools and methods, may allow us to gain a little more understanding and appreciation about some methods and motivations of makers of the past?
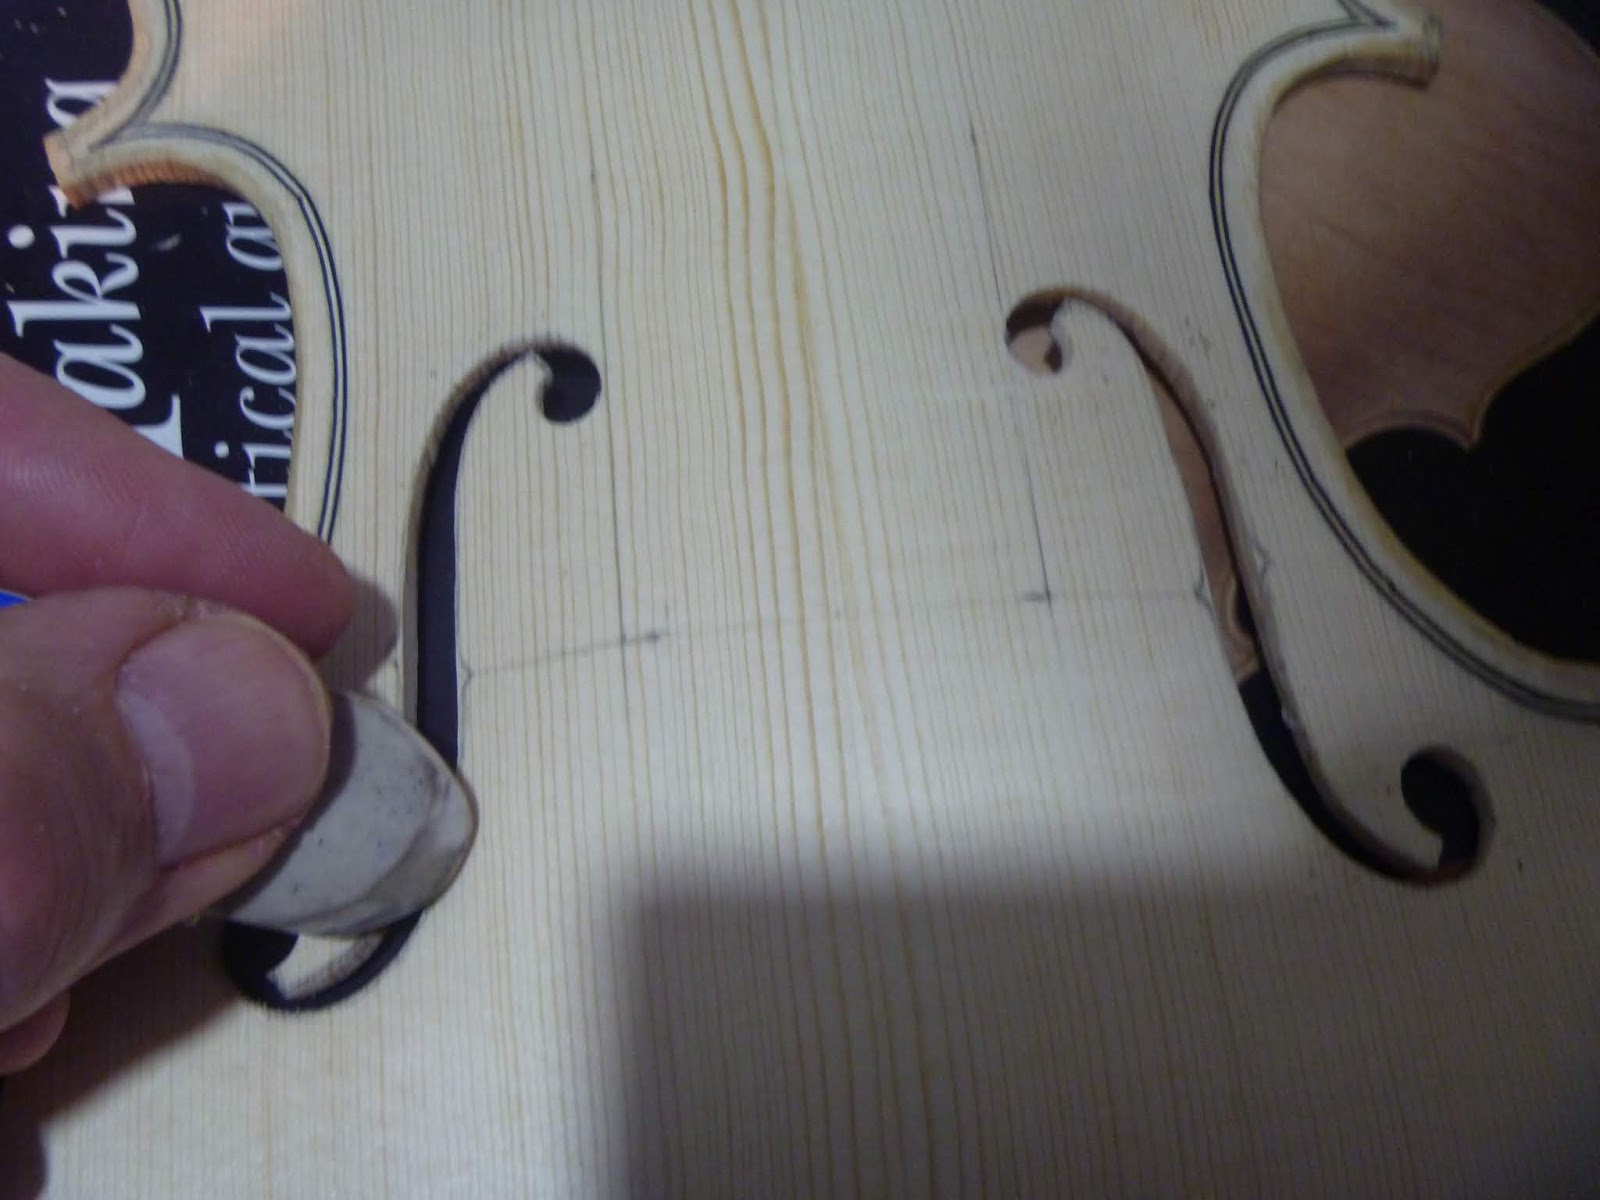
2nd June Sound holes
After having scraped my soundboard to thickness it was time to start the f holes. Having determined where they should be on the soundboard I then used a tracing I made from a plan to mark out the centres of their circular ends. I used a soft pencil to avoid having to scrape off 'engraved' pencil marks later.

I then used my awl to make a mark to finalise these centres

I then used the same awl to carefully bore a small pilot hole ready for the sound hole drills I made.

Drilling the soundhole ends

I drilled nearly half way through from each side, then finished the hole from the upper surface. Just in case if any wood had split out as the drill passed through, it would have been on the inside of the violin. Here the last hole has been drilled from each side.

The drills aren't perfect but worked well and I was quite pleased with the result

Then I used a very badly cut paper template to mark out the other parts of the f holes. I reasoned to myself that the template was a guide to get the shapes nearly there and fairly symmetrical. Also, they kept moving around making them difficult to draw around so I probably would have got a similarly imprecise result with perfect templates. They were good enough though, and I would be able to make adjustments as I actually cut the holes with the knife

Using an old fret saw to cut out the bulk of the wood

3rd of June (After midnight)
Using a knife to cut down to the pencil lines

F holes nearly cut. They are far from perfect but I am resisting the temptation to keep adjusting them and going too far

Wash your hands! Save time! Protect your workpiece!
At school one of the worst aspects of making stuff in woodwork lessons was cleaning the finished thing up. We used to spend hours sanding off marks made by dirty hands and heavy pencil lines. I wash my hands after sharpening tools to keep the work clean and I try to keep markings light to avoid spending extra time and spoiling nice surfaces having to clean them off. I am removing my clumsy pencil marks here as they were distracting and preventing me from seeing the actual outlines of the nearly cut f holes
I had difficulty cutting the 'nicks' cleanly and the holes are not symmetrical but they I would probably make them worse if I keep picking at them. Overall though, I am quite pleased with their imperfect but acceptable shape

3rd of June (Daytime) Bass bar beginnings
Splitting a piece of spruce for my bass bar

Using a pencil and washer to 'spile' the contour of the soundboard onto the bass bar

Trimming roughly with knife

Trimming slightly less roughly with a plane

The roughly fitted bar in place

4th of June More Bar fitting
Small wooden studs are made to keep the bar in the same position during fitting.

The bar is clamped in position and warm glue is applied to the studs and they are pushed gently in place against the bar and held for a minute or so.
Chalk is used to test the fit of the bar against the soundboard.

Using a small homemade plane to take off the high spots where the chalk has been rubbed on contact with the soundboard

5th of June (After midnight)
After some difficulty I found that a scraper was the most controlable when removing very small amount of wood during fitting. Here the bar has been test clamped up, dry, using homemade clamps. The under side of the wooden clamps are padded with folded up bits of soft paper to protect the soundboard.
I warmed the workpieces while I heated the glue and the bar seemed to 'grab' immediately when I applied it to the soundboard. This, hopefully, indicated that my bar fitting was ok as the surfaces must have gone together closely a bit like in a rubbed joint? Here I am using a bit of sharpened soft wood to remove some partially set glue

5th of June (Day time)
Next morning I removed the peg clamps and it seems ok.
The small studs are removed by carefully splitting them off with a chisel. I realised then that I should have glued them so their grain was horizontal so that when removing them I would not risk hitting the soundboard. Extra care was taken.

The shaping of the bass bar could then commence. First taking height off using small planes
 |
| Small plane and small Flag of Earth |
6th of June (Mystery after midnight)
Like much of violin making, determining the size and shape of the bass bar is a misterious art I took my measurements from a book. Here I have marked the bar ready for further shaping
 |
| Entering the Twilight Zone via the Tap Tone? |
Once the bar is ok in terms of height then cross section is then shaped. I used small wooden plane first. Wooden planes are good here as they will not tend to dig into the soft soundboard wood as a metal plane might when planing the sides of the bar near the bottom

I then tried a knife and found it difficult to control

I found a chisel a bit easier to contol, keeping my fingers placed to prevent the edge hitting the soundboard

Here the bar has been planed and chiselled

The bar can then be scraped to a near final shape.

The book suggested trying to flex the bar carefully with the soundboard held against the side of the bench. I tried this and the bar seemed too 'stiff' but having no experience I didn't really know! It was getting late and the night was becoming a bit too mysterious for me, I concluded that it was a good time to go to bed and I could cogitate violin questions as I drifted off to sleep.
6th June (Daytime)
I care fully removed a little more wood from the bass bar and tested by flexing it against the bench. It seemed to yeild a little more easily and to bend in an even manner so I thought it best to leave it at that.

The ends of the bar were then shaped with a chisel

Now, the Neck
Putting the soundboard aside I spent much time finding a bit of sycamore for the neck. This little chunk of wood, like the back was from the log I got from the churchyard.

I tried to saw the wood in an economical way so I can maybe get another neck out of it. This involved some difficuly in holding the little quarter log

Here the neck has been sawn out of the log leaving the remaining lump as big as possible and hopefully a big enough cross section for another neck for a future violin.

My neck blank next to the template I will trace and use

Links!
Just in case you haven't noticed the links I have put in the text at times. Don't forget to go back and click on the links (in blue letters) if you want more information.
 |
| Some rusty Links |
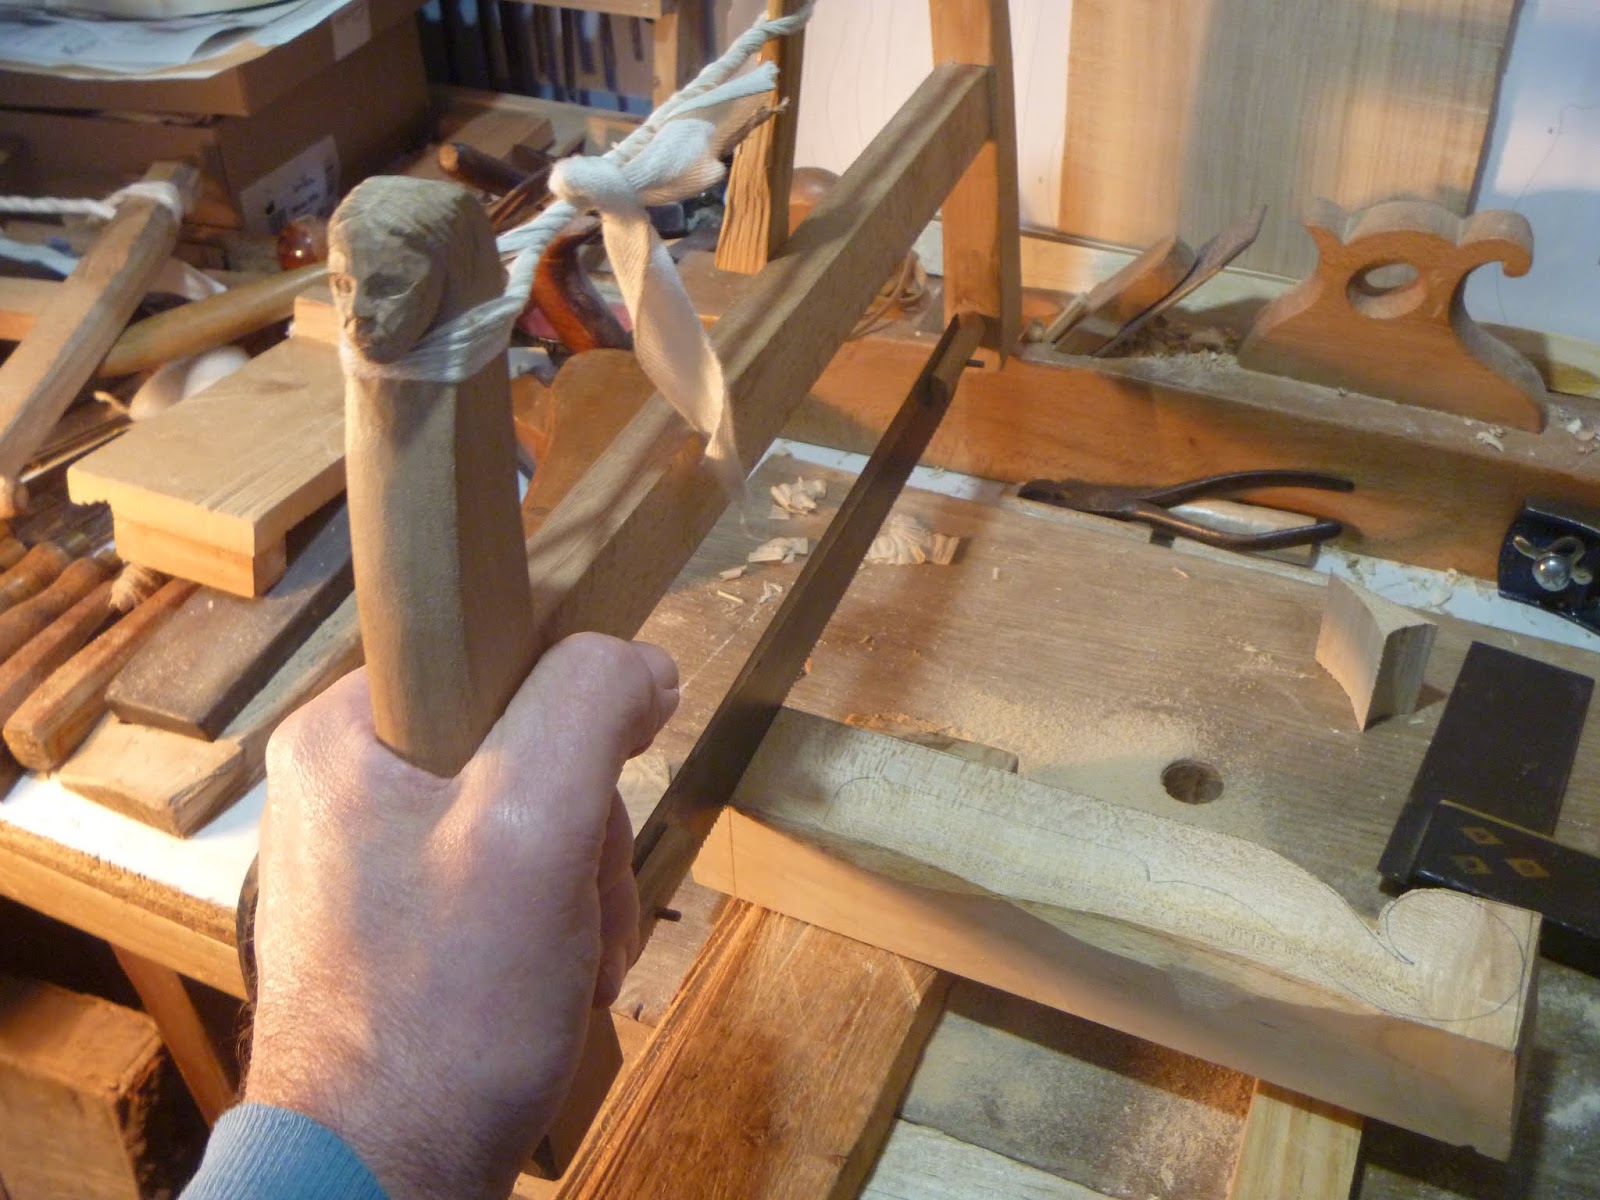
7th of June Neckst steps
Here I am planing my neck blank against an improvised bench stop

Planing the neck again using three pegs and a wedge to hold the wood on my small experimental historical bench top.

Here I am transfering the design from my tracing onto cardboard by using a sharp scriber to prick marks through the paper. The dots are then joined to make a drawing on the card

The card template can then be carefully cut out

I then drew around the template on both sides of the prepared neck block and marked the positions for the pegs and the dots delineating the spiral of the scroll by pricking them through the pattern with the scriber

Sawing the neck to length
Starting to saw around the scroll

8th of June
This picture shows the 'notch' and wedge vice in use on the front of my small experimental 1560's style benchtop (see Here and Here - again, for more on this kind of thing) It works quite well and some day in the future I would like to make a full sized bench along these lines to try it out properly

Sawing the neck in the 1560's style vice

The neck sawn roughly to shape

Chiselling down to the lines

Refining the outline of the scroll

I couldn't reach into this part with chisels so held the saw between my knees and moved the scroll carefully back and forth to reach into the corner

Using an awl to mark the peg hole positions through the card template

Drilling the peg holes (they will be reamed to fit the pegs later) using an old brace and shell bit. I have a liking for these old bits, they can be sharpened easily, they are nice and simple in form. They have to be centred carefully though and dont clear the wood chippings out of the hole like a spiral auger does. Similar drills have been found from the Viking age Mastermyr chest

A closer look at the shell bit. I have a small wooden square to help me keep the drill vertical. I drilled half way from each side as I reasoned that if the drill was off square at least the outer part of the hole which remains after the pegbox is excavated would be in the right place and any internal wanderings would be carved away during excavation?

The holes met in the middle (this seeming accuracy may have been assisted by some flexing of the drill when the two holes met?)

Neck with templates on the small experimental bench top

Time flies
Little conkers already on the Horse Chestnut tree in the churchyard

Lime trees are starting to form their flowers ready to spread their most pleasant scent in a couple of weeks

Another pictuere of the old lime tree in the churchyard the evening sun warming its old limbs

Marking a centre line on the scroll and neck

Using dividers to mark the nut width around the centre line

The pegbox template in use

Marking the curved part or 'chin' at the rear of the scroll

Making sawcuts across the pegbox to make it easier when chiselling down to the marked lines

The narrow sections of wood between the saw cuts can be chiselled off with reasonable ease and with greater control

The pegbox roughly chiselled to width

Another view

9th of June
Sawing the chin roughly to shape

The scroll after marking out the shape of the rear and first turn of the spiral by tracing around the paper 'fishtail' template seen next to it

A saw is used to cut away much of the wood around the first turn of the scroll

A chisel is then used to remove the wood freed off by the saw

Here the sides of the scroll are chiselled down to the pencil lines

The scroll taking shape - slowly.

10th of June
The sides of the scroll are being chiselled down to the markings

The first turn of the scroll is refined using chisels and gouges

Here the second turn has been marked out and this part of the scroll is then sawn and chiselled as above. Because this kind of work is quite unfamiliar to me, having last attempted it about four years ago, I worked slowly and carefully.

One side done

Here the scroll has been roughly cut.

11th of June
Using a file to create the chamfer on the scroll

Using a flattish gouge to smooth out the surfaces of the spiral,

12th of June
Excavting the pegbox using a small gouge

Here I have reached the four pegholes

Here the pegbox has been excavated and is just about done

The fluting is then started on the rear of the scroll

The fluting is carried on around the top

A piece of scrap wood is used to prevent the gouge from marking the pegbox when cutting the flutes on this part of the scroll

13th of June (After midnight)
The scroll is just about good enough for this violin cobbler I can still tidy it up a bit more later but it was nearly bedtime so I stopped after a taking a few pictures

Side view

Rear view. The centre line need to be tidied up but I may make it worse so may just leave it. I have made a small curved triangular recess at the chin as I liked this little feature when I saw something like it on a couple of old English violins.

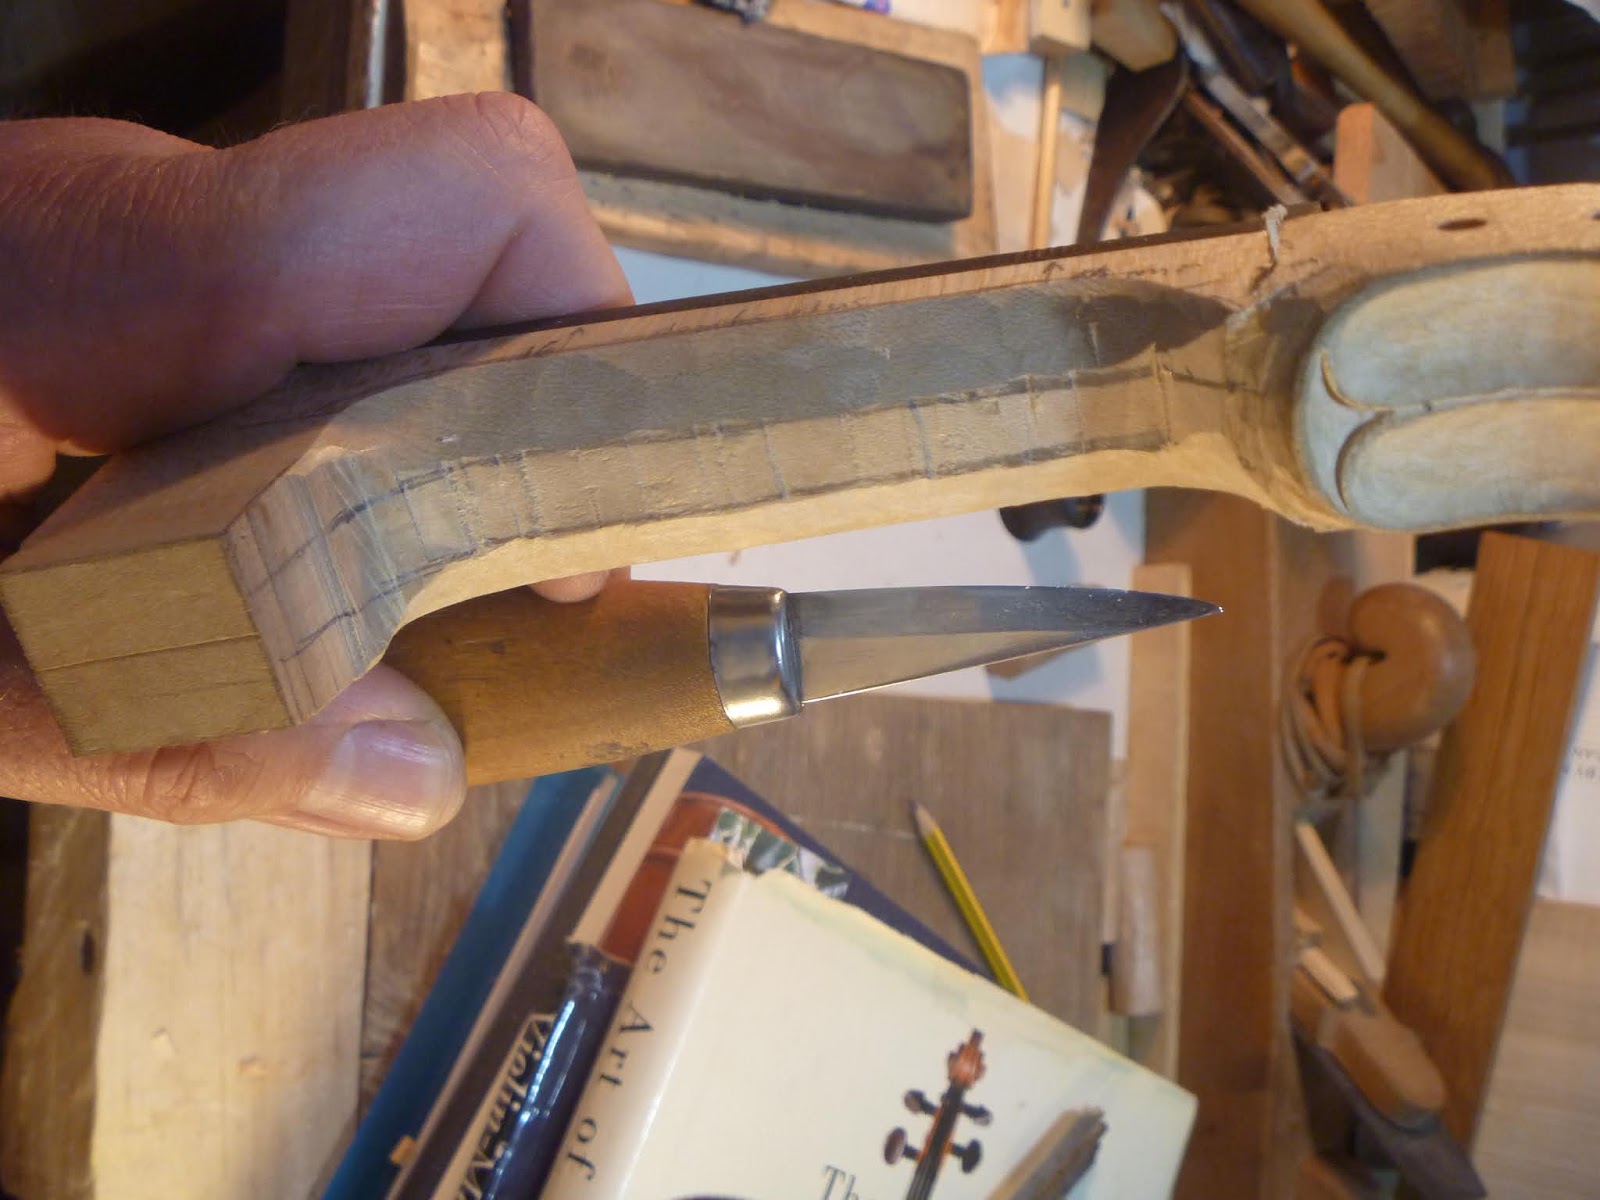
13th of June (Daytime) Fitting the fingerboard
Violin fingerboards can be bought partially made but still need a lot of work done on them. I needed to make a device to hold my fingerboard while working on it. I used a bit of old beech pallet for the base and soon discovered it was a particularly hard and intractable piece of wood

I thought I would try an old curved profile wooden plane to help make the hollow for the fingerboard to sit in

I sharpened the plane and it worked fairly well

The fingerboard resting in the planed hollow

14th of June
The fingerboard holder was completed by gluing on two strips of wood, Here they are after the glue has set

Planing the gluing surface of the fingerboard

Here the fingerboard width has been scribed on the underside and chalk rubbed in to help show the scribe marks on the ebony
The fingerboard is then planed carefully to width

The end is filed to flat and to the required angle

It is then marked and trimmed to length carefully with a knife

The trimmed end is then filed down to the markings

Using a small sliding bevel to check the angle of the filed end

15th of June. The end in Sight?
I've just realised that apart from shaping the neck, the main woodwork has been done. From now I will be working on fittings and tidying up and assembling the parts I've made, so there is still a bit to do! Here I have used a wedge and string to hold the fingerboard on the neck in the position it is to be glued

Four small pieces of wood are then glued on the neck surface, two on each side pressed close against the fingerboard for a minute or so until the glue holds. These temporary studs will ensure the fingerboard will be in the correct posion when it is glued to the neck.

Here markings on the fingerboard and neck can be seen lined up

The fingerboard is removed and the positioning studs are allowed to set. Here the finger board and neck can be seen along with the three wedges and pieces of string arranged in readiness for hasty clamping.

I warmed the fingerboard to try to give me more gluing time and, as quickly as I could, applied the warm glue and placed the fingerboard in position against the locating studs. Unfortunately one of the studs popped off as I hadn't let the glue set long enough (seen below in my hand) and I struggled getting the second lot of string in place but eventually managed to get all three of the strings and wedges in place. The fingerboard had slipped up towards the scroll by a tiny amount and I will know next time to wait for the glue to harden on the locating studs! All in all though, It didn't go badly for a first experiment with using wedges and string for clamping a fingerboard - a method an economical 17th century violin maker may have used?

16th of June. Royal Patronage? Maybe?
Today I checked the viewing statistics on this blog of mine and noticed that of my six page views two were from the USA. I immediately thought "I wonder how Harry and Meghan got to hear about the Violin Cobbler?" Well, you never know! Anyway whoever you are, please keep on dropping in, there will always be a red carpet welcome for whoever visits the Violin Cobbler, old or young, rich or poor!
 |
| His Royal Woodness extends a hand of friendship to all of his public |
Meanwhile, I needed to make a make a template to check the curvature of the fingerboard as I worked on it. here I am using a pair of dividers to scibe a curve of 42mm radius on a piece of scrap rib wood

The hollow in the fingerboard as supplied has to be excavated further, here I etablished the outline of the hollow then stopped as the finger board playing surface has to be worked on first. Then it can be hollowed afterwards to leave a thickness, on the thinned area, of 4 mm

The edges of the fingerboard are marked to a thickness of 4.5 mm (I wish I had marked this before gluing as it was very fiddly with the edges of the neck wood in the way!) a corner is then planed off down to the marked line

17th of June (After midnight)
Here both edges have been planed down to the markings producing chamfers on the edges which can be used as a visual guide - they get narrower - when working towards the desired fingerboard profile and thickness

Planing the fingerboard, the planing is done from each of the ends, raising the plane after it passes the middle. This means the middle gets planed a bit more than the ends which tends to produce the slight hollow that is required in a violin fingerboard.

Regular checking is necessary with the template and straight edges

It was after midnight now so I stopped, but first I removed the irons from my planes to remind me to sharpen them before resuming the next day. The planes I have used have single irons - no cap iron - to fit in with my 'historical' experiments. (Modern small block planes have single irons but their sharpening bevel is upwards)

17th of June (Daytime)
After the neck profile has been planed satisfactorily a file is used to remove the small facets left by the plane

Then a scraper is is used to refine the surface further

I had to spend some time taking some material off the pegbox end of the fingerboard because it had moved upwards when one of my locating studs popped off during the gluing operation. Hopefully I'll remember this awkward extra job and not to let this happen on the next one!

The nut needs to be made now. I cut a small piece of ebony from an offcut of guitar fingerboard, shown here

After some planing, chiseling, trimming with a knife and filing the nut blank is ready to glue

The nut is ready to glue in position

The glue is applied and the nut is centrally placed and held firmly in position for a minute or so until the glue holds

The nut glued in position

18th of June
The shaping of the curved profile on the fingerboard made me wonder if a hollow plane could be used at some stage? Here are some old hollow soled planes, the moulding plane, sitting on the fingerboard, is nearly the right curvature. I wonder if the fingerboard hollow could be worked using a moulding plane carefully and with practice?

The neck root marked out

Reducing the neck down to width, first making sawcuts

on both sides

Then removing the waste with a narrow chisel

You may have noticed here (and several times preciously) I am using the waste piece from sawing out the neck placed behind the neck to create an even surface when pushing heavily against the pegs/stops of my small viceless bench top

Making a flat and even surface with a wider chisel

Cutting out a neck shaping template

Measuring the thickness of the neck and fingerboard, using my home-made Stradivari-style calipers, to work out how much material is to be removed.

Marking the neck shape using the template

Making sawcuts on the back of the neck to allow the easier removal of waste wood

The waste has been chiselled off and lines are drawn on to mark out the corner material to be removed as the arched neck cross section is gradually worked towards

Taking the corners off with a knife

Sharpening, I have a fondness for natural stones, probably just because they are old and the patterns in the stone can look nice. The one on the left cuts quicker and is not as fine as than the one on the right

Neck corners removed
19th of June (After midnight)
Here the neck has been roughly rounded with the knife

Continuing rough shaping, the file can remove the bumps and facets left by the knife

June the 19th (Daytime)
When I went to empty my tealeaves on the garden I was greeted by a blackbird fledgling sitting near my doorstep awaiting some food. The father came in a little while, tweeted a lot and delivered what looked like a fat yellowish caterpillar!

While out for a walk I noticed this elm regrowing from its stump. It was cut down a few years ago but is making a comeback.

My mother always liked her wallflowers, I've never seen them actually growing out of an actual wall but I suppose I've never looked, these are next to a busy road. (I've just looked on the internet and I think these are not wallflowers, I did sniff them and didn't detect the nice scent I expected. However, they are flowers and they are on a wall so that's good enough for me!)

Filing the nut to height and profile

Using a scraper to clean off the scroll. I try to keep my work clean but my scroll has been handled a lot and has got grubby!

Using a small scaper to clean the flutes at the back of the scroll

June the 20th (after midnight)
Nut profile filed and scroll cleaned up a bit

June the 20th (Midsummer and Violin ready for assembly)
Dawn over the tyne valley
I awoke early today and noticed this spectacular sunrise so took a picture before going back to sleep

I have big hands so I'm making the string spacing the same as my violin. I made the nut with slightly wider spacing a couple of years ago.

The scroll on my violin was snapped in two and had metal plates on it when I got it. I repaired it and have left the the screw holes and the repair white. You may notice the extra peg hole, someone must have wanted to carry on playing this violin when the scroll snapped so tried drilling an extra peg hole.

The same violin has a nicely figured back

Its f holes are quite angular and you can see the inked on purfling. I wonder how quickly it was made? It still sounds nice and someone must have liked it enough to graft the head on a new neck at some point even though it seems to be an 'economy' model?

Taking the measurements from my old violin with a pair of dividers. The spacing is 17.25 mm, only 0.75mm more than the measurement recommended in the book I'm using. I transferred the measurment to the new nut using the dividers to make marks

I used a small pair of dividers to divide the measured string spacing into three


Minor Disaster! Modern glue to the rescue!
I pressed a bit hard making a divider mark near the edge of the nut and split a small section out. I had to resort to super glue to repair the slight damage, hence the sad face.
A knife is used to make the point marks into fine lines

A small file is used to enlarge the knife lines. I will finalise the depth of the slots later

The nut has been tidied up a bit and the violin is just about ready to clean up and assemble! Exiting times!

Midsummer Magic?
I went for a walk this evening and as I strolled through the churchyard I heard a small rustle as I passed by some overgrown shrubs. My eyesight is getting worse and has definitely been strained by all of this violin cobbling business. I looked towards the sound and could have sworn I saw a very small naked wooden man standing at the edge of the undergrowth, he was watching me with a peculiar knowing look. I rubbed my eyes, looked again and he was gone! |
| Was it my imagination or did I really see a Small naked wooden man? |
I resumed my walk, leaving the churchyard swiftly and remembered these wise words "Always take care when you go down to the woods [or the churchyard] looking for some material to Whittle - especially on Midsummer night!". Listen to this Music to find out what could happen! You may get more than you bargained for, if you are unlucky - or lucky?
 |
| Foxglove Hat, typical midsummer gnome attire |
It was with some relief that I reached the reassuring sight of the top of my street, the sun was setting and the sky was streaked with red.

21st of June
I was wondering if I could make some closing clamps which used a wedging action intead of screws. Imagining what a violin maker of the past (or of today?) could have used if they were not so well off . I thought a bit and reasoned separate wedges would be another thing to slip and go wrong during an already tricky process. So I thought the wedge could be in corporated into opening of the clamp like a wide version of a wooden bass bar clamp
I had several blocks of soft balsa-like wood salvaged from pallets cluttering up my kitchen so I though I would use some of them, here is one here.

Using an axe and mallet/club to split the wood is a lot quicker than sawing. Also I was soon to rediscover that the dust from this wood is quite irritating to my nose so the less sawing the better!

The wood cleft easily and nicely. I discovered that these were too thick and rigid, thinner pieces had a little springiness in them which was desirable. The nail holes have to worked around to avoid the clamp splitting

I experimented with the length and angle of the 'jaws' and glued pieces of cork floor tile to help soften and improve the gripping surfaces.

Here I am testing the clamp and it worked ok,

A batch of clamps artfully arranged to display the marks of their pallet ancestry

22nd of June
I rehearsed applying the clamps. Here my thumb is supporting the violin rib while my fingers push the clamp into place

More testing of my clamps
If a clamp breaks they can be glued and reinforced with string as can be seen here.

23rd of June
I made a few more wooden clamps with slightly smaller opening to use in C bouts as the arching is highest here and the ends of the first lot of clamps were hitting the arch before they were getting tight enough.
24th of June Getting ready to glue!
Now the fun starts, I have my clamps so it was time I got the back ready to fit to the ribs. Here I am filing a chamfer around the edge, as a first step in the edge profiling, as this will be difficult to do once it is fixed to the rib. I really ought to clean the brass out of this file!

I have also removed some wood next to the button so I could continue my chamfer right up to it

25th of June (After Midnight)
I though I'd better make some holes for pins to help locate the back in position during gluing. I should have done these much earlier. Locating pins would have been helpful in avoiding things slipping back when I was establiishing my outline from the rib structure. Better late than never. I selected a couple of nails of the right size to use. Here I have the back clamped on the ribs and am using an awl to make a mark where the locating nail will go
I was reluctant to use a modern twist drill and had no brace bits small enough for the required hole so dug out a home-made bow drill of the correct size. The point had snapped off a few years ago so I sharpened it on a stone as well as my old eyes could manage. It worked slowly but achieved the desired result. A hammer with an indentation on the side is used to apply pressure to the drill

The finished hole

Locating pins/nails in place

25th of June (Daytime)
Tapping the blocks to release the rib assembly from the mould
When gluing the linings some glue got in between the mould and the ribs .I used a table knife to carefully ease the ribs off the mould

Easing the ribs free

Free at last!

The blocks now have to be chiselled to shape

I made my blocks from some heavy resinous pine type wood reclaimed from a pallet hence the nail hole seen on the right side of the endblock after shaping

Now the corner blocks

Using a flattish gouge to make the corners slightly 'concave'

Blocks shaped

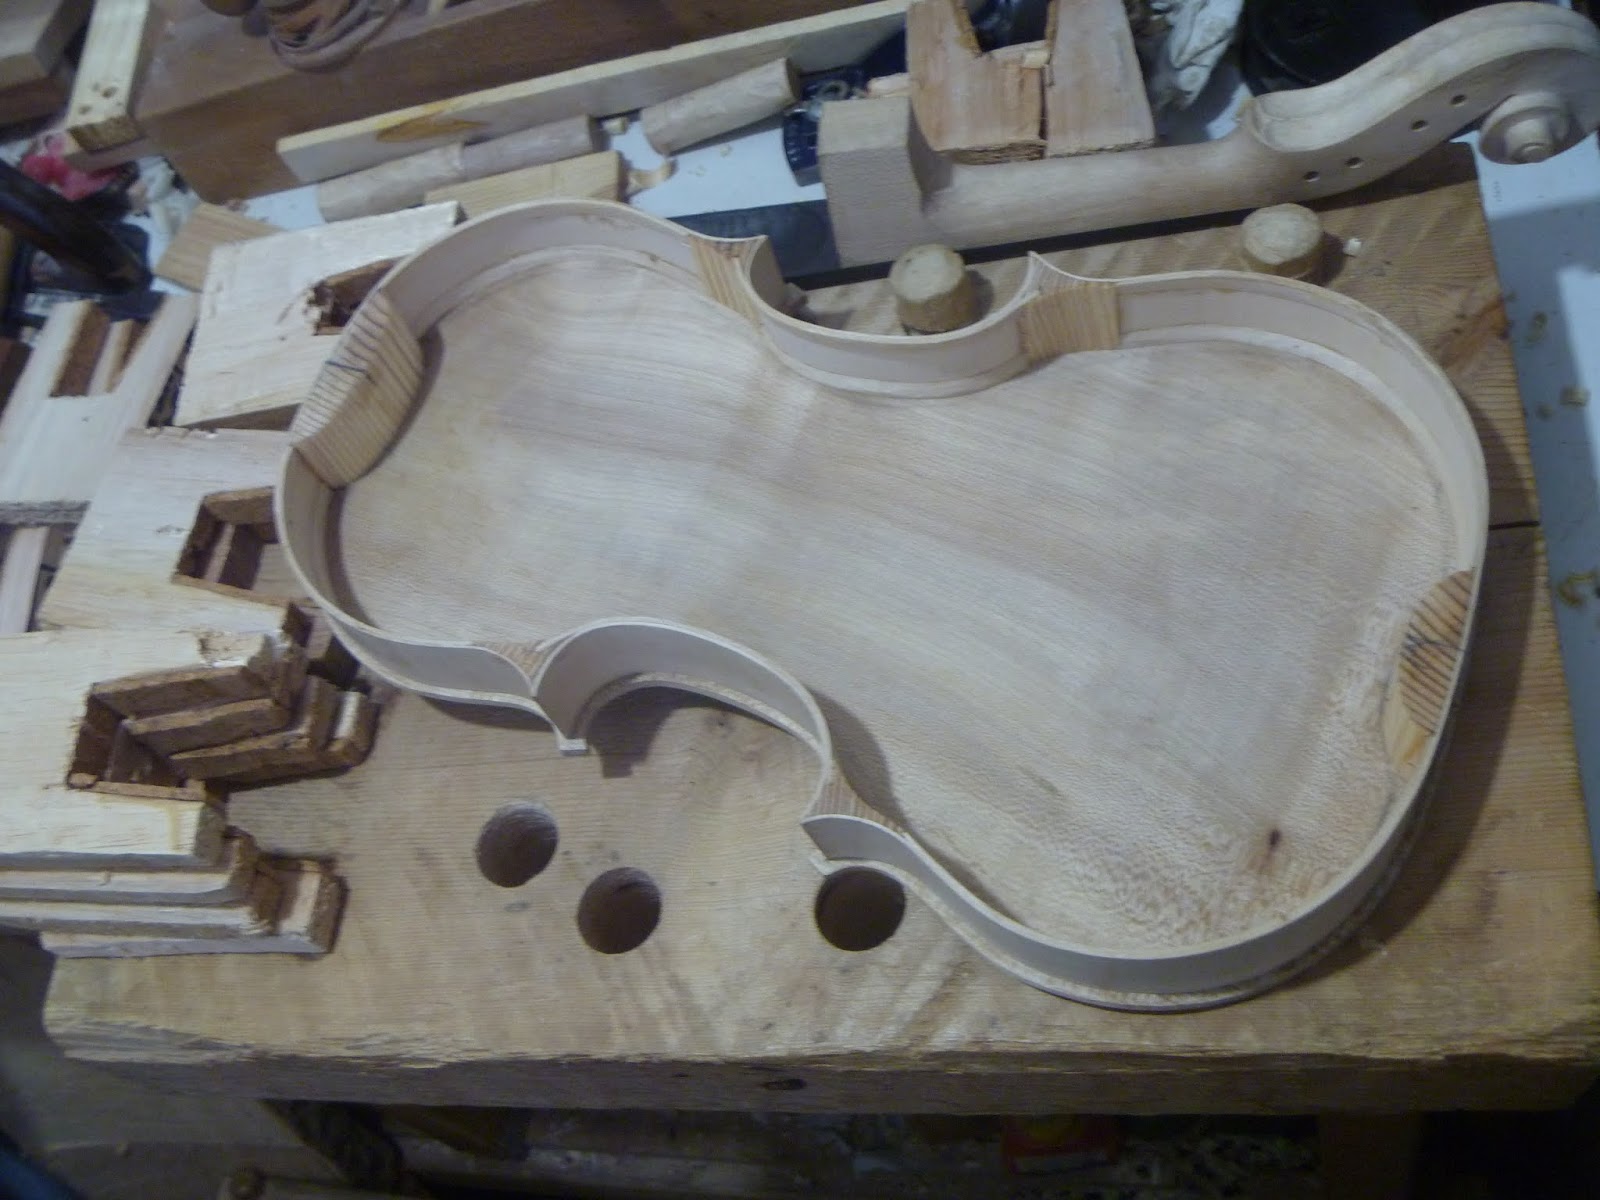
The ribs placed on the back

The clamps all in place ready to start gluing

A clamp or two is removed then a thin knife is dipped in the warm glue and inserted between the rib and back surfaces to apply the glue. The thin space draws the glue in, I suppose with a capillary type action? I have no glue on the knife here I was 'posing' just for the photo before the real gluing action started

Glue drips and squeeze out it removed with a damp brush

The back glued, the wooden clamps seemed to work quite well

The nails are still in place as I have still got to glue the neck and bottom blocks

No this is not filler for my glue joints, its a Shepherd's Pie ready meal! I thought I would stop for dinner while the glue dried as I haven't got enough clamps to do the neck and bottom block areas.

After dinner as I had the glue on the go, I applied a little glue to the neck root to 'size' the end grain surface. If is was not done when gluing the neck the end grain could possibly absorb the glue and draw it away from the joint area

Removing the locating nail/pin

The endblock glued. I took the clamps I needed off the parts I glued first, before dinner, as the glue would have the best chance to be set by then

The neck block glued and clamps in place

Ribs glues to back

The clamps seem to have worked quite well and could be quite useable with a bit of refining. I think I will try making the angle of the jaw opening less steep to improve the clamping action and pressure. Also a few more would have been helpful and a smoother and thicker layer of cork on the jaws with a bit more 'give' would be improvements.
26th of June
I woke up at 4am and couldn't resist taking a picture of the dawn sky before going back to bed
 |
| Dawn, looking North over the tyne valley |
I took my clamps off and found my gluing had been succesful apart from, because of lack of care (and lack of locating pins?) when tracing around the ribs and in establishing my outlines, the over hang is a bit too large in areas and too small next to the corners. I can try to reduce the overhang a bit but I'll pay more attention to this and do better next time if I am to reach the next level of violin cobblery!
Using the bow drill again, this time for the soundboard locating nails/pins. This kind of drill should be used more often in violin making as it is also known as a Fiddle Drill

I signed the soundboard with my name etc

I then had to drill a hole for the end pin. I found a shell bit of the right size and then gave it a bit of a sharpen - this is one of the reasons I like these old drill bits they can be readily hand sharpened on a stone

Removing the burr a bit - perhaps leaving a bit of a burr improves the cutting action?

I centred the shell bit the best I could and used a small straight piece of wood to help me drill perpendicularly and horizontally and proceeded slowly - the drill, if a little off centre can be corrected a bit by leaning it over and sort of pushing it to coax it in the desired direction, before the hole is full diameter, then straightening it up and continuing

I took my time to avoid splintering out when the drill came through and the sharp drill made a nice clean hole, here it is coming through

I made this reamer years ago for fitting my lute pegs. I filed it a sort of hexagon shape from a piece of silver steel bar, a bit wasteful but I had no access to a forge and I doubt I would have achieved the heat needed for this largish piece of metal with my biscuit tin forge set up. It looked the right taper but I drilled and reamed a test hole in some scrap wood and I was lucky, the endpin I had fitted nicely! I have an old tap wrench to put it in when using it

Home-made reamer in action. It cuts slowly but means there is less risk of going too far and making the hole oversize

I thought of attempting to whittle an endpin but bought some from e-bay!

It fits well, as far as I can see.

I could have pushed the pin right in but thought the hole can be enlarged a bit more later

I got some hand made paper, my fountain pen and my scissors and made my first violin label

The label glued in place.

The label seen though the f hole. I was quite pleased with myself to have got this far! I am tempted to tidy up some of the uneveness of the f holes but will probably leave them well alone.

I didn't have enough clamps as some of those I used yesterday were not large enough to cope with the additional depth now the soundboard was on. So I did one side then stopped for dinner and cornet practice while the glue set a bit. One of the clamps split due to a weakness caused by a nail hole, so I glued it and tied it around with string ready for use on later, when gluing the other side

After over three hours I removed the clamps except for the two next to the end blocks. I put the clamps on the other side and applied the glue as before by removing one or two clamps at a time and applying the glue to the 'seam' with a thin knife, putting the clamps back on, moving around like this, unclamping, gluing then reclamping one section at a time. here both sides of the soundboard have been glued and I am usning a wet brush to remove glue drips

27th of June
I removed the clamps and it all seemed reasonably well glued

I used a chisel and knife to reduce the over hang = luckily mainly on the back as the top wasn't too bad - this was an extra job that I could have avoided by taking more care earlier. After I had done this I then had to re apply the chamfer to the underside of the top and back where it had been reduced or lost entirely.

A knife is used where the chisel can't reach easily

I started to file the other chamfers that would be blended together to produce the curved edges and found my old file was very very slow

So I decided to use a chisel

and a knife

followed by the file to round the edge

The edges rounded and can be further refined later

28th of June (After midnight)
Using a knife to whittle a small scrap of spruce to plug the locating pin holes
Testing for fit
Two bits of sycamore ready for the holes in the back
The pins are glued in place and I also applied some glue and wooden clamps to two corners that were slightly open at their points

Plug in place on the back

28th Of June (Daytime)
One of the back plugs carefully trimmed back with a chisel, the surrounding glue can be scraped off later
Starting the neck to body joint
The joint outline gently scribed. I have to admit I included this picture just to show off this old scriber and its clip. Despite the rust there is life in her yet!

Using a knife to take the marks across the soundboard edge. I should have used a thinner knife here as the thick blade made wide v shaped nicks, Luckily the application, later, of a little moisture swelled the compressed wood and rectified this

Making the depth of the joint on the soundboard

Removing half the top thickness to start opening the front of the neck mortise. Befor using the knife, several close spaced chisel stabs have been made across the opening to help break up the wood and allow easier and more conrolled waste removal

Chiselling the waste away

This is repeated to remove the full thickness

A knife and steel rule are used to cut through the ribs which can be carefully chiselled avay to reveal the neck block and to start excavating the joint. Note. When starting my back I drew a button on the inside to give me an idea of how much material to leave. The actual button is going to be smaller and different to this marking

I knew this very small steel square would come in handy some day! I am using it as a straight edge to regularly check the joint floor is flat when removing material during the neck fitting

Wood is removed gradually from the sides and floor of the mortice and the joint fit tested. There are lots of variables here to confuse a violin cobbler so I proceeded very, perhaps too, cautiously!

29th of June
Testing the fingerboard elevation on a bridge held in the correct position with elastic bands
The joint is getting nearer completion

Checking the neck is central

The neck is nearly ready to glue into place and I need to use an appropriate clamp. Let me see, is this the right size?
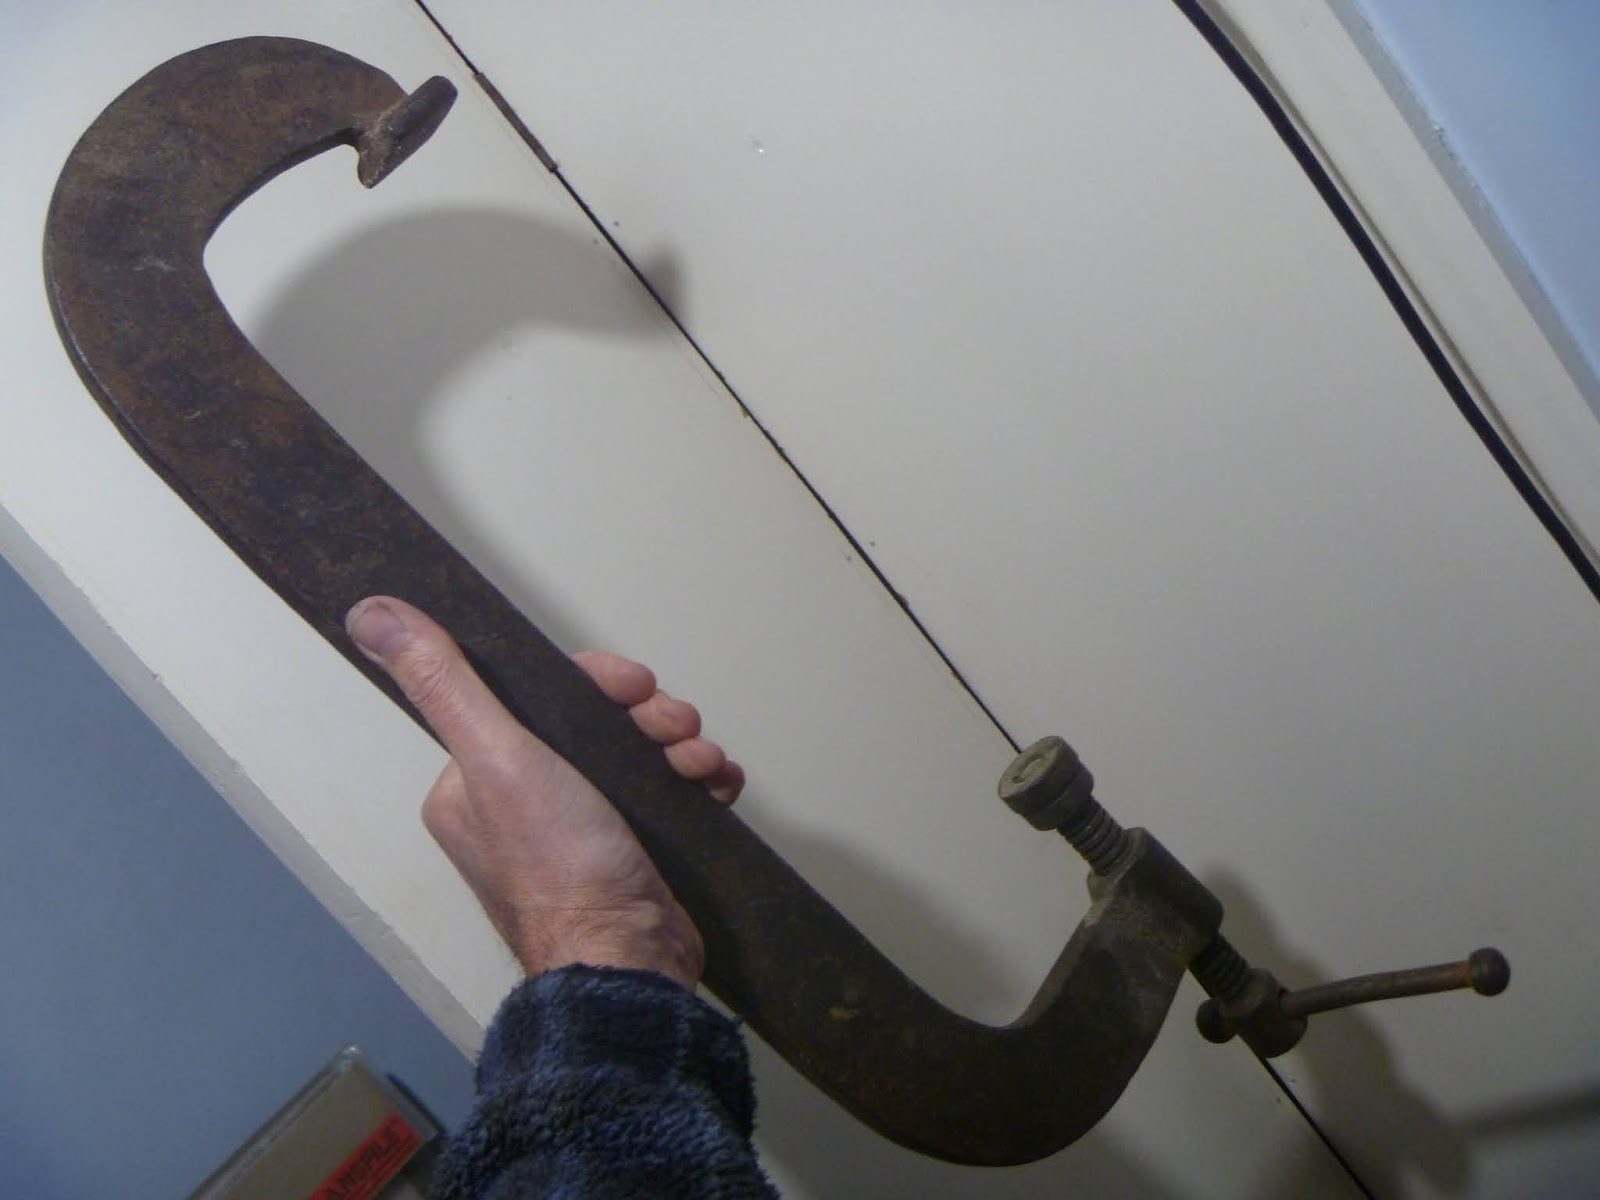 |
| Very Big G Cramp/ C Clamp |
30th of June (After midnight)
From the last picture you can see I own at least one modernish clamp but I thought it would be interesting see if I could use some kind of wedge operated clamp/jig. After some thoughts in bed as I went off to sleep and a few rough sketches I came up with these ingredients (In the end I made the wooden frame sections smaller as I realised the clamp needed to be close to the body to apply the pressure in the neck joints area, I also put the small piece of limewood log back in my wood hoard as I found a smalled piece of willow I could use up!) The 4 inch nails are just being used as thin metal rodsIt was late so I went to bed and my sleep was disturbed with persistent thoughts of wedges, nails, pivots and violin neck joints
 |
| The stuff of nightmares? |
30th of June (Daytime)

The Icing on the Clamp?
I was using some scraps from a large beam I acquired many years ago. It is quite hard, heavy and resinous, maybe Pitch pine? I noticed this nice pattern on the endgrain of one of the pieces it reminded me of the dragged or feathered patterns seen in the icing of custard slices, some bakewell tarts and certain other cakes |
| Attractive marble cake-like wood grain |
1st of July (After midnight)
My clamp was completed and tested and I was ready to go, well as ready as I ever would be! I arranged my things while the glue heated. The rulers are for testing the neck after gluing so adjusment can be swiftly made. The hammer is for tapping the wedge into place to tighten the clamp.
I applied the glue fitted the neck and slipped on the clamp device and wedged it in place. The fingerboard piece is soft willow and is arched roughly to fit a fingerboard and to apply even pressure. It pivots on the nail, the idea being thatit will move to accomodate the angle of the fingerboard apply even pressure and will hopefully be useable on other violins with varying angles. You can see one of the very rough dovetails on the frame, no glue was used it can be taken apart and improved if needed.

Checking the neck alignment, it looked ok

I left it to dry over night.


The button and neck after shaping with a chisel and knife

The neck and button after further shaping with scraper and file

2nd of July
I made the opening for the saddle in the same way as I opened the neck joint. this time I used a finer bladed knife to avoid the v shaped notches that were made by my thick bladed knife.
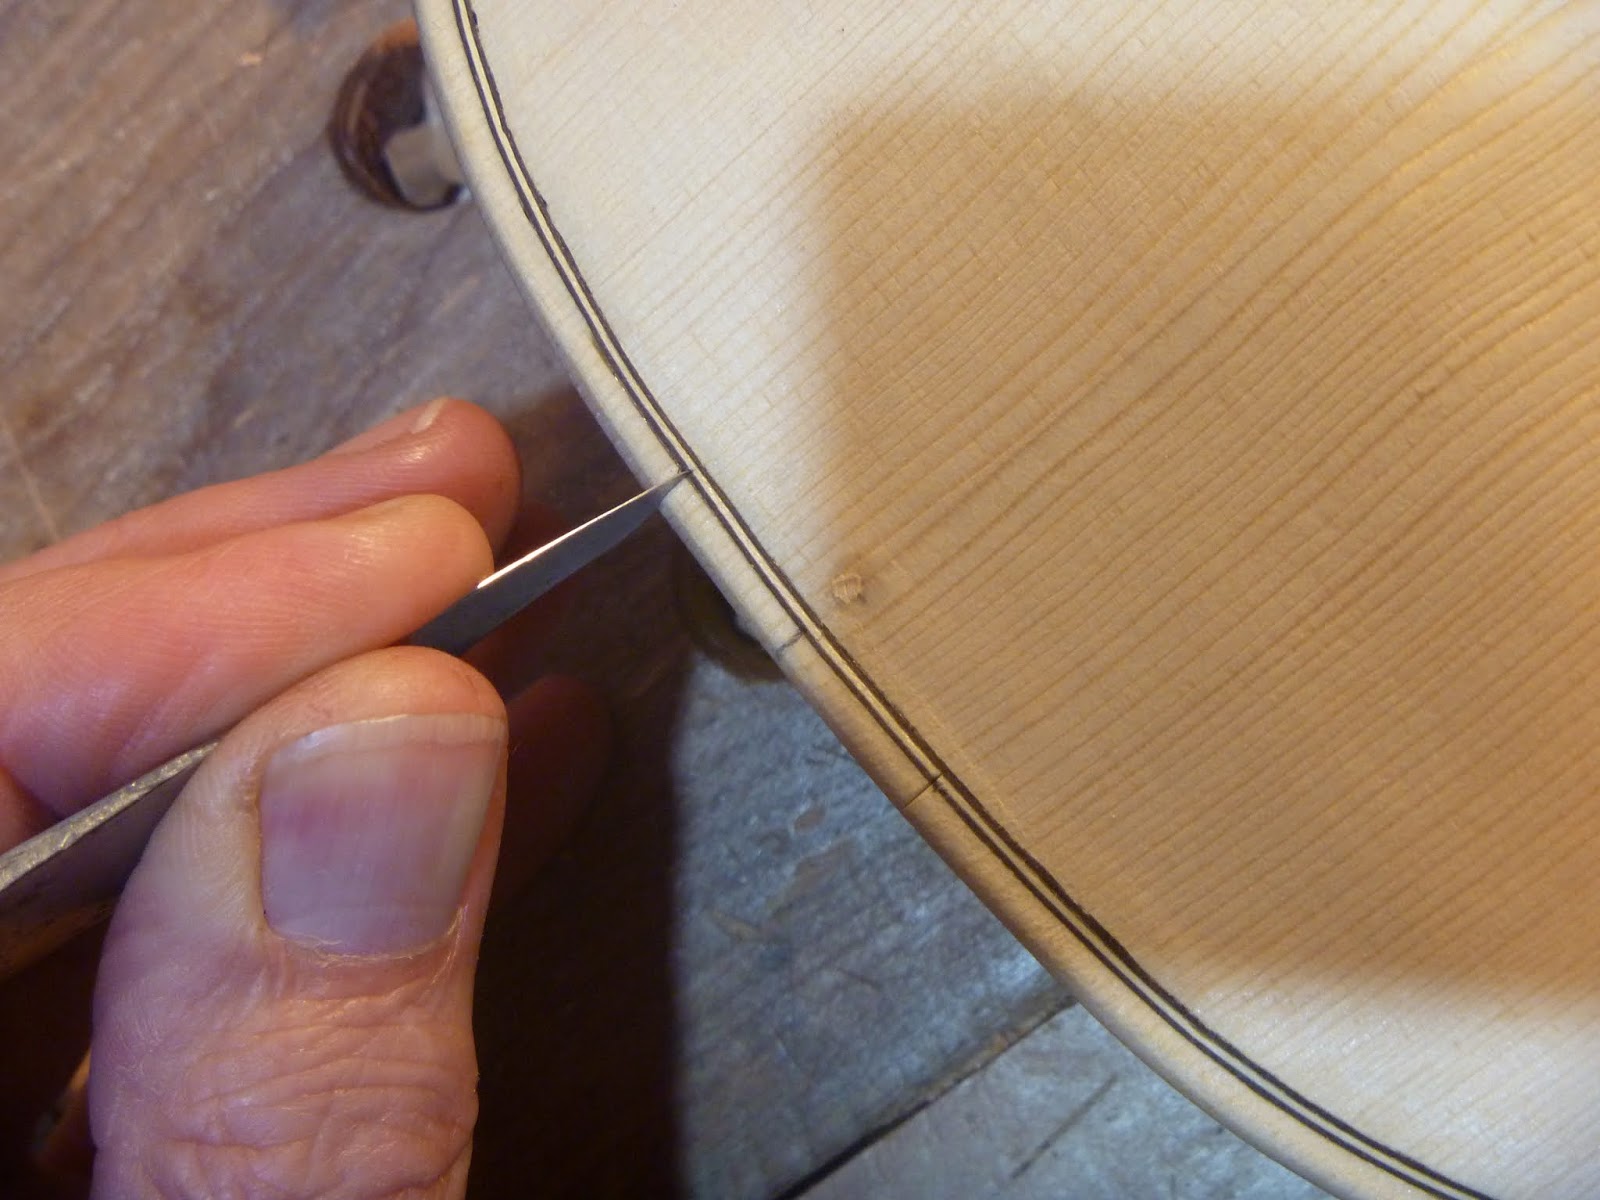
I cut a small piece of ebony from the piece of scrap guitar fingerboard and here the opening has been made

An angle is planed on the saddle

A knife is then used to shape it a bit more

3rd of July (After midnight)
Some glue is warmed and applied to the roughly shaped saddle which is placed in the opening and held fot a minute or so while the glue takes hold and then left over night to set
3rd of July (Daytime)
Today I was hoping to get the violin strung up. I started around 4pm and used a chisel,knife and file to finish shaping of the saddle
I then layed out the tools and things needed for stringing the violin. I have a bridge blank, a set of newish used pegs I had, an old tailpiece, my end pin, some soap and my home made reamer

I reamed the hole a little more so the end pin could be pressed into place moderate pressure

I started reaming the peg holes and discovered that my home made reamer's taper wasn't quite correct for my pegs, luckily I had a factory made reamer amongst my tools so I continued with that

The home made reamer was still needed to open up the small holes

Then the factory made reamer could then enter and complete the job

The pegs fitted

No photos but I spent a few hours struggling to fit bridge satifactorily. I need to get eyes tested and good glasses!
4th of July (After midnight)
With the bridge fitted I made a bridge template out of scrap rib
The E and G strings are put on so the bridge can be shaped and profiled to achieve the correct string heights. Unfortunately the old tailpiece I was going to use would not take the fine tuner I was going to use, luckily I remembered I had bought a new one with integral fine tuners so I used that, it was getting too late to spend time altering the old tailpiece if I was going to get the strings on that night/morning!

The bridge done it was time to make a soundpost. Here I am starting to chisel a square piece of pine I split from a promising piece of wood a few years ago

The soundpost ready to fit after shaping with a chisel, knife and scraper

After a long struggle I managed to fit the soundpost after shortening it, trying it, retrieving it many times. The bridge has been profiled and thicknessed and here I am dividing up the string spacing

By about 4.30am, all the strings are on and I was tuning the violin up for the first time, tired but quite excited!

Could that be a bearded Paganini in the mirror? Maybe!
After 5.30am a ghost in mirror? Trying his newly made violin. He was quite pleasantly surprised with the sound. It is reasonably loud and not too harsh. I wonder what it will sound like after varnishing and how it will develop over time?

After 6am, time for bed. The violin is hung in the bedroom window to try to get some colour into the wood before varnishing, It will need to be cleaned up and the fingerboard and neck shaped a bit more before varnishing so there is quite a lot still to do! But I am quite pleased with my violin

6th of july
Here is a picture of my little mulberry tree, some of the berries have been ready for a while and I enjoyed eating quite a few a week or so ago. The berries are small because the tree is small and in a pot. Today I noticed that there were no ripe, black, berries only under ripe green and nearly ripe red ones. I fear the birds may have noticed my little tree and are taking the ripe berries before I can get to them!

Here is a close up of a lime tree blossom and some unopened buds on one of the big old trees in the churchyard

Here is a young tree filled with blossom, the scent of each flower is not strong but if you get a tree full of flowers and breeze in the right direction the effect is very pleasant and brightens up my day - or evening

These flowers, being knitted, don't have a scent but they are nice and colourful and really brighten up the shopping centre. They don't need watering, last all summer and can even come out again the next year!

8th of july
Lime blossom - Sniff now or wait until next year
If you go out for a walk you may have an unexpected feeling of pleasantness and then notice a delicate sweet scent coming from somewhere. Lime trees are in blossom at the moment but not for long, some trees or parts of them have already finished and are already forming the green bobbly fruit so, if you can. go out now and breathe in a bit of summer.10th of July Look at my new post, please!
I plan to add more to this post when I start to varnish my violin but in the meantime to improve my violin cobbling skills I have started two new violins to be built in a different manner, on the their backs, without a mould, a method more often used in the past than today.
Hello, I will add to this blog again sometime but in case anyone is interested, I have been putting my violin making experiments and other woodwork stuff here (see below) for a while
Hans Kipferle's bench (Violin Cobbler) - Contemporary Maker's Gallery - Maestronet Forums


Great to see lockdown hasn't turned you into a grumpy old Hector. It's lovely to see you've started a blog and are focusing on your passion. I can't wait to see more updates. Warm Regards, Siobhan x
ReplyDeleteThanks Siobhan. When the good days return we can get down to some whittling on the farm?
DeleteThe short-nosed elephant is indeed an excellent and renowned baker of violins!
ReplyDeleteHe is second only to the flightless, giant, northern boll-weevil, in that respect, Harry.
ReplyDeleteUtter genius... Whickham trees also seem to be the best in the country. There's a beech tree in Chase Park that's now called 'The Parks' Heart' - around 400 years old would you say? And a nice mention of The Beatles just for me!
ReplyDelete"The Park's Heart" sounds very picturesque. Herodotus, In the part of his book dealing with 'The 300 Spartans' mentions "The Black Buttocks Stone" I wonder if there's one of these hidden in the park near the secret path?
DeleteI'd love to commence some social distancing whittling sessions as soon as we can. I've enjoyed reading some more of your blog today, particularly the trees you've encountered on your walks. There are a couple in particular I'd like to introduce you to when you visit Pelaw/Bill Quay. Take care, and hope to see you in the not too (socially) distant future
ReplyDeleteAbsolutely brilliant. Really enjoy reading all off this. Such a talent.
ReplyDeleteInteresting read.
ReplyDeleteHow does ‘Joe Hutton’s March’ sound on the ‘corona’ fiddle?
ReplyDeleteGreat work Andrew. Two great hobbies combined. The use of vintage tools and musical instruments...not to mention the appropriate clothing when wielding an axe!! Good job you didn’t have your Lederhosen on. You might have chopped your leg off! D
ReplyDeleteReally good stuff! I enjoyed reading this. The violin is looking brilliant!
ReplyDeleteThanks Ian, It is far from perfect but i am pleased with it and it sounds quite nice to me. I still have to varnish it and hope the sound doesn't change too much. I hope you are doing ok in the present times
Delete